CLEARING
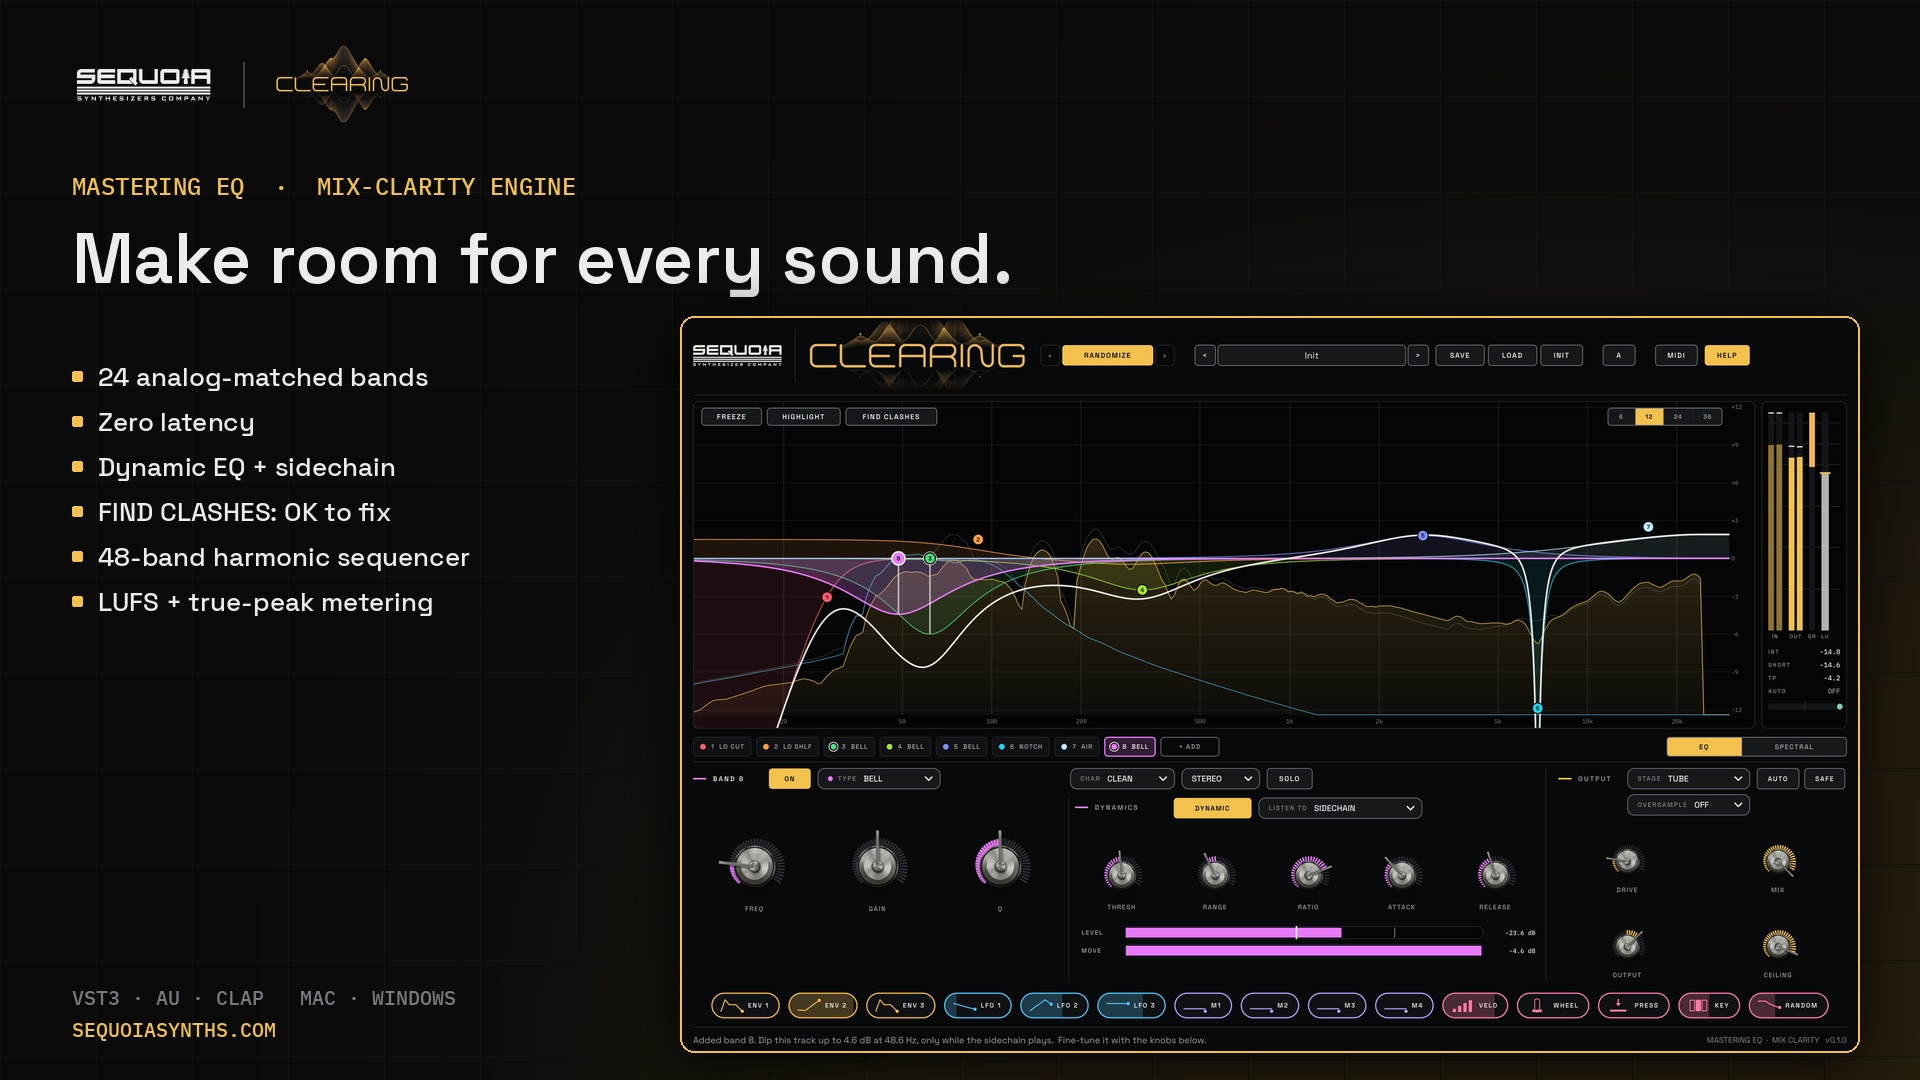
A mastering equalizer that clears the mix. Analog-shaped curves with no latency, a live spectrum you can freeze, and FIND CLASHES: CLEARING finds where sounds fight, you press OK, and CLEARING builds the fix.
01Welcome
CLEARING is an equalizer for mixing and mastering. It gives every sound room to breathe: it shapes tone with the smooth, wide curves of high-end analog mastering EQ, and it finds and fixes the places where sounds fight, such as kick against bass, or vocal against synths.
Rest the mouse on any control and the help bar along the bottom of the window explains it in one sentence. Click HELP in the header for pop-up tips next to each control as well.
02Installing
CLEARING runs on macOS and Windows as a plugin in your DAW. It is an effect, so there is no separate desktop app.
| Format | Mac | Windows |
|---|---|---|
| VST3 | /Library/Audio/Plug-Ins/VST3 | C:\Program Files\Common Files\VST3 |
| AU | /Library/Audio/Plug-Ins/Components | Mac only |
| CLAP | /Library/Audio/Plug-Ins/CLAP | C:\Program Files\Common Files\CLAP |
To use the sidechain, route another track (a kick, a vocal) into CLEARING's sidechain input in your DAW.
03Activating your licence / free trial
CLEARING comes with a 14-day free trial. Everything works, and there is nothing to sign up for. The first time you open CLEARING on a computer, a short welcome window greets you and then takes you on to activation, which starts the trial.
To unlock CLEARING for good, buy it at sequoiasynths.com. Your licence key appears on the thank-you page and comes by email, with a .seqlicence file.
- Open CLEARING and click the trial status at the bottom of the window, or right-click HELP and choose Licence...
- Paste your key (it starts with
SEQ-), or drop the.seqlicencefile onto the panel. - That's it: CLEARING is unlocked on this computer, in every project, and every open CLEARING window unlocks at once.
CLEARING checks your key on your computer. It needs no internet connection and no account, and it never sends anything anywhere. Your licences are kept in ~/Library/Application Support/Sequoia Synthesizers/Licences on a Mac and %APPDATA%\Sequoia Synthesizers\Licences on Windows. Keep your .seqlicence file somewhere safe: it activates CLEARING on your other computers too.
04Quick start
- Put CLEARING on a track or on your mix bus and press play.
- Click a curve line (and drag) or double-click the spectrum where you want to lift or cut. A band appears there; drag its dot up or down for gain and left or right for frequency. Scroll on the dot to make it narrower or wider.
- Press FIND CLASHES: CLEARING pins every place where sounds fight. Click a pin, then OK to fix it or NO to leave it. To check one spot yourself, press HIGHLIGHT and drag across it.
- Turn on AUTO to hear the tone change without the volume change, and use A / B to compare two settings.
05The window
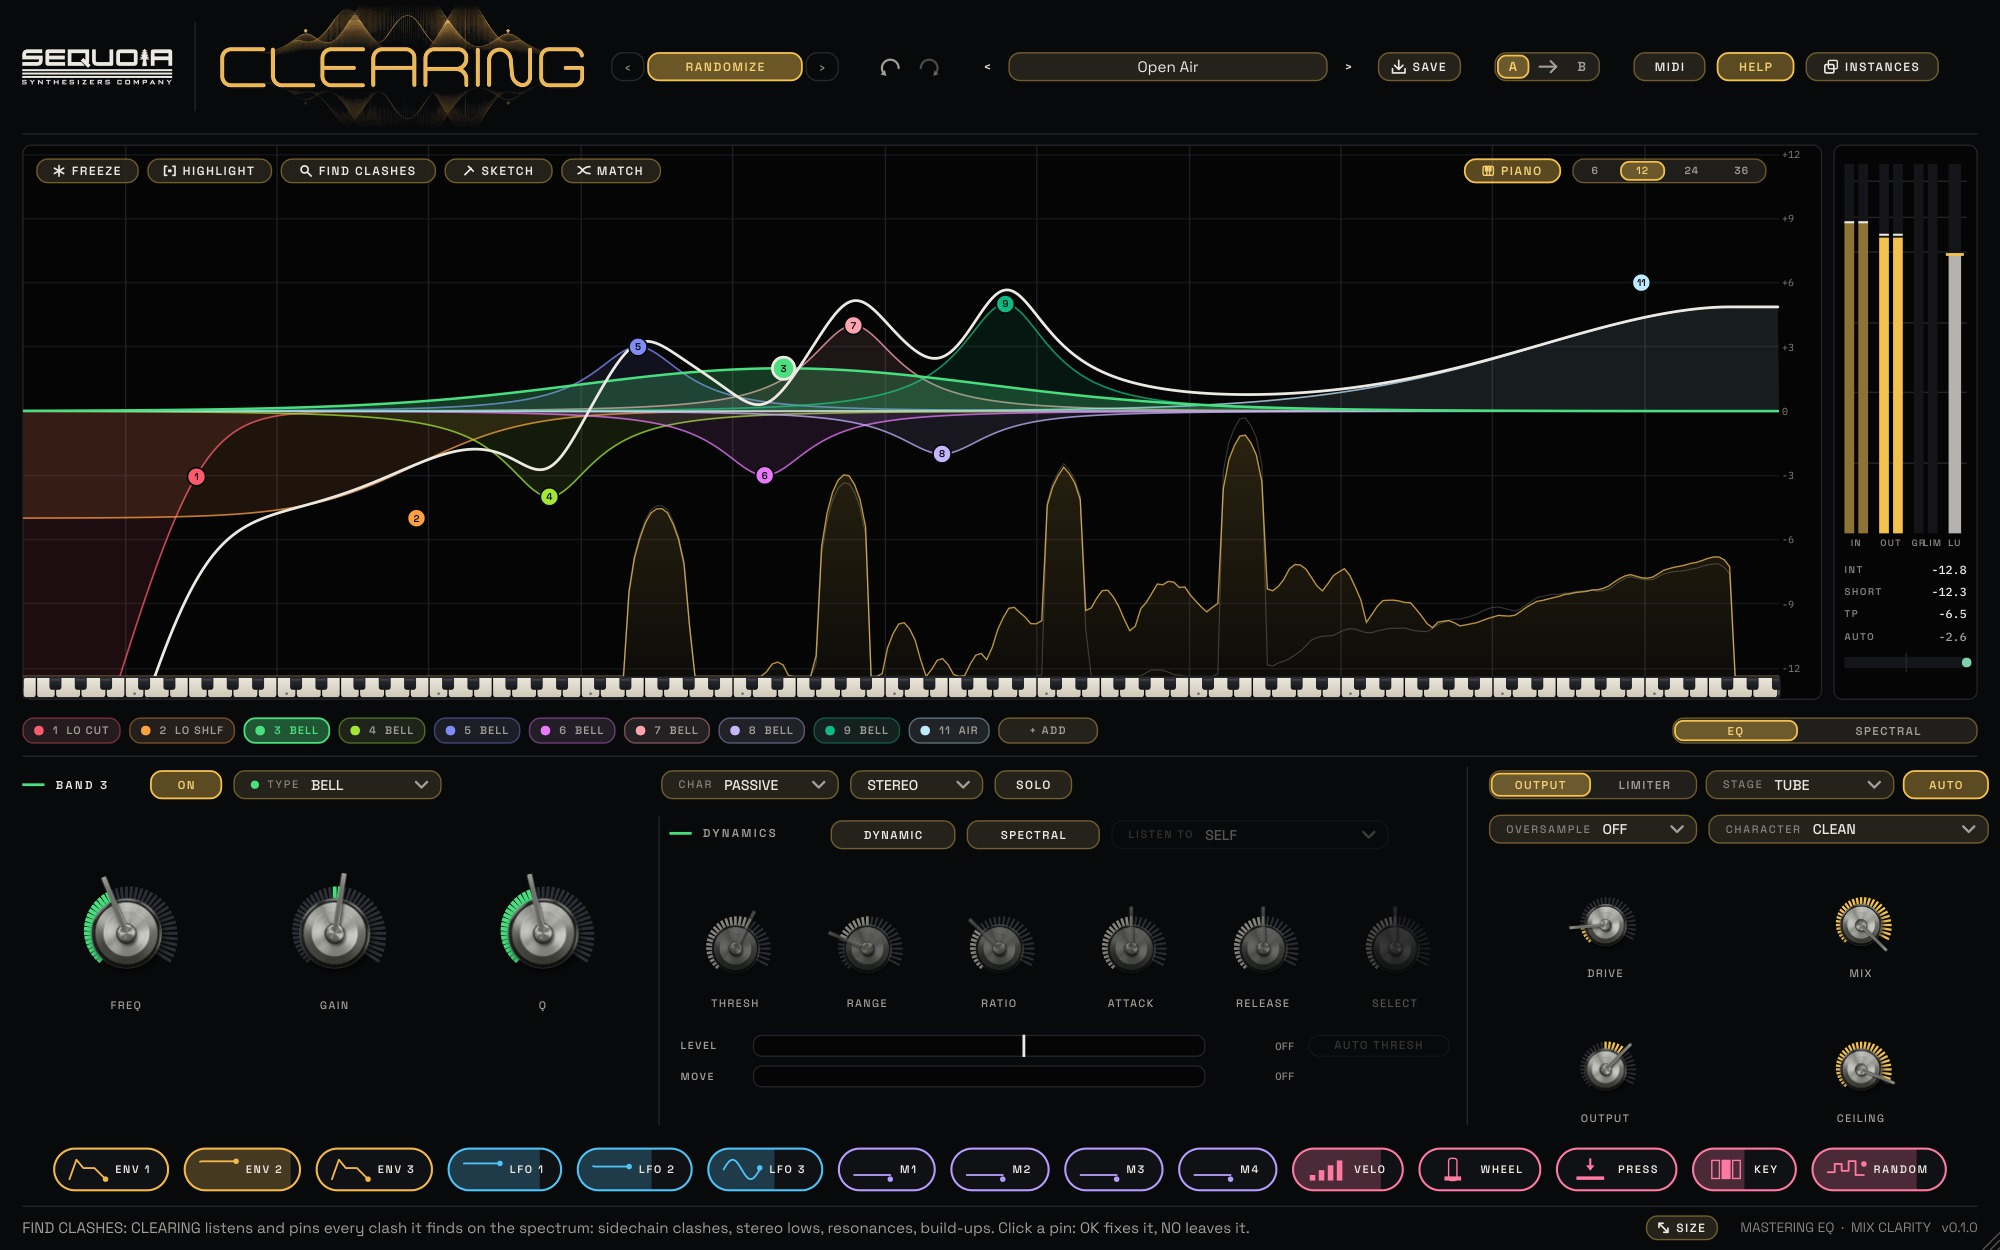
| Area | What it holds |
|---|---|
| Header | The Sequoia gear (settings and manual) at the far left, then the logo, ‹ RANDOMIZE ›, UNDO / REDO, the preset bar (‹ name › SAVE; click the name for the preset menu, with Init and loading a file), A/B, MIDI, HELP and INSTANCES. |
| Spectrum | The live spectrum, the total EQ curve in white, and every band's own curve and dot in its own colour, always shown, with FREEZE, HIGHLIGHT, FIND CLASHES, SKETCH, MATCH, ALL TRACKS, PIANO and the range (6, 12, 24 or 36 dB). |
| Meter bar | Input and output on the LED ladder, gain reduction and loudness as rows of LEDs, with integrated loudness, true peak, AUTO and stereo correlation underneath. |
| Band tabs | One coloured tab per band in use. Each band has its own colour: the first band of each type takes that type's colour (LOW CUT red, BELL green, LOW SHELF orange...), and any further band of the same type gets a new colour, so no two bands share one. Click to select, right-click for its menu, + ADD for a new band. The coloured dot at the left of a tab is that band's ON: click the dot to switch the band off (the dot becomes an empty ring and the tab stays, with all its settings) and click it again to switch it back on. To take a band away for good, use Remove band in its menu. |
| Band strip | The selected band: ON, TYPE, SLOPE, CHAR, STEREO, SOLO, the big FREQ GAIN Q knobs, and DYNAMICS (DYNAMIC, SPECTRAL, LISTEN TO, AUTO THRESH and six knobs). |
| Output | Three tabs. OUTPUT: STAGE, AUTO, OVERSAMPLE, CHARACTER, and DRIVE, MIX, OUTPUT, CEILING. COMP: ON, AUTO GAIN, and THRESHOLD, RATIO, MAKEUP, ATTACK, RELEASE, MIX. LIMITER: LIMITER, SAFE, TRUE PEAK, AUTO REL, AUTO GAIN, DITHER, and INPUT, CEILING, ENHANCE, ATTACK, RELEASE, KNEE. |
| Chips | The modulation sources: ENV 1–3, LFO 1–3, M1–M4, VELO, WHEEL, PRESS, KEY, RANDOM. |
Pick the window size with SIZE at the bottom right (SMALL, MEDIUM, LARGE, EXTRA LARGE or FIT TO SCREEN), or drag its corner. It stays sharp at any size and remembers the size you choose.
The gear: settings and manual
The round gear at the top left of the window opens a menu: Open the manual (this manual on sequoiasynths.com), Window size..., Fit window to screen, Welcome screen (shows the welcome window again), Licence / activate..., Show my presets folder, sequoiasynths.com, and About CLEARING with the version number.
The welcome window
The first time you open CLEARING on a computer, a welcome window appears with a short message, the version number and the button OPEN MANUAL. Press GET STARTED (or Enter) to close it; CLEARING then takes you on to activation, which starts your free trial. It appears only once on each computer. To see it again, choose Welcome screen from the gear menu.
06The spectrum
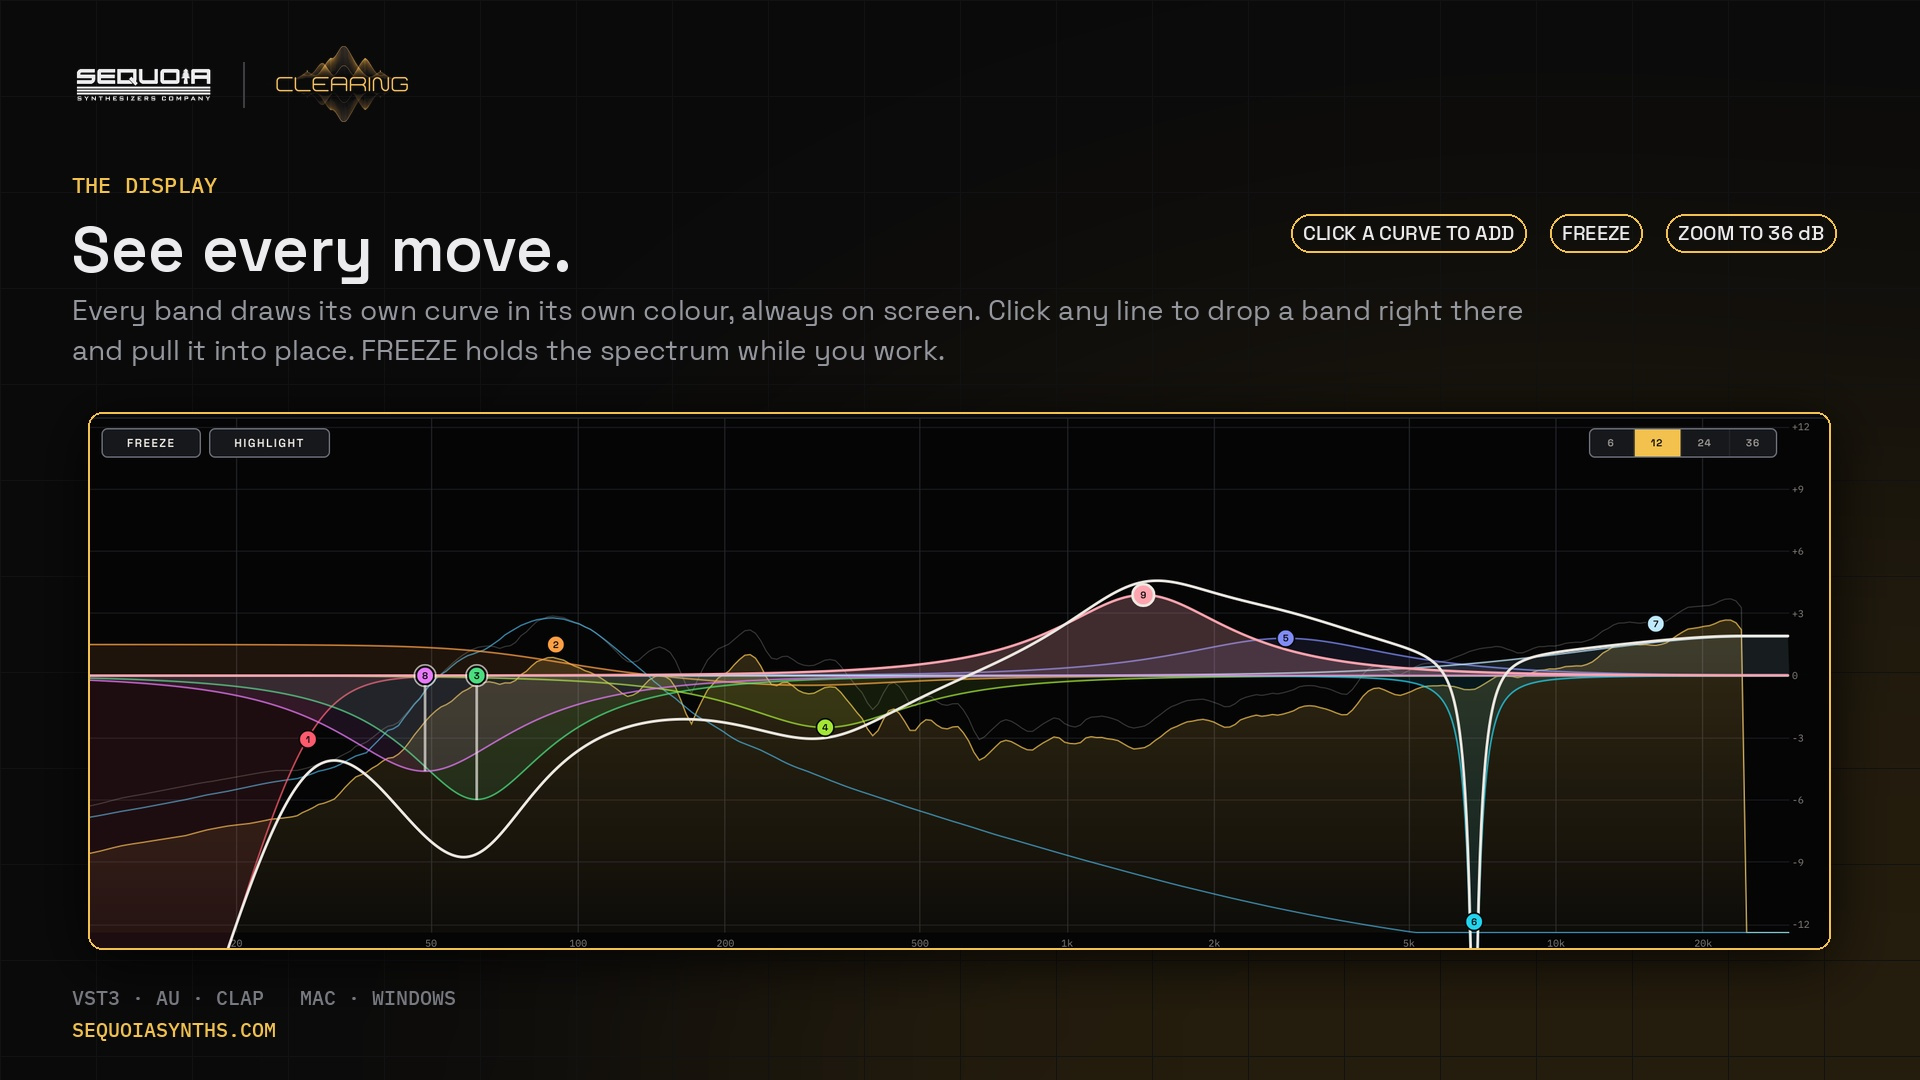
The gold fill is the sound coming out of CLEARING. The faint line is the sound going in, and a pale blue line shows the sidechain when one is connected. The spectrum slopes 4.5 dB per octave, so a well-balanced mix reads roughly flat.
| Do this | To |
|---|---|
| Click a curve line | Add a band right there on any line (the white total curve or a band's own coloured curve) and, without letting go, drag up to lift or down to dip. A small + shows when you are on a line. Handy after a LOW CUT: click further along its line and pull up the area you want. |
| Click a peak of the spectrum | Move the mouse along the gold spectrum: a ring marks the nearest peak. Click it (or double-click) and a band appears exactly on that peak, as narrow as the peak is; keep holding and drag down to tame it or up to lift it. |
| Cmd-click a peak (Ctrl-click on Windows) | The nearest band jumps onto that peak, and the same drag moves it on from there. |
| Double-click empty space | Add a band there (a cut at the very ends, a bell in between). |
| Drag a dot | Move it: left/right for frequency, up/down for gain. Hold Shift for fine moves, Alt to move frequency only. A dot always sits where you set it, even on a DYNAMIC or SPECTRAL band whose curve is moving, so you can always grab it. While your DAW is stopped, the curves stop moving too. |
| Scroll on a dot | Change its Q (width). |
| Double-click a dot | Remove the band. |
| Right-click a dot | Its menu: type, character, stereo, dynamic, solo, remove. |
| FREEZE | Holds the whole spectrum still, so you can study a moment and shape the EQ against it. The curves and dots keep following your changes, and FROZEN shows in the corner. Press it again to let the spectrum run. |
| PIANO | Shows the frequency scale as a piano keyboard with the C of every octave named, so you can put a band right on a note. The key under the dot you hold lights in the band's colour, and the readout names the note. The keys play too: hold a key to LISTEN to just that note's part of the sound (the note and three semitones either side) and slide along the keys to move it; let go and you hear everything again. Double-click a key for a flat bell exactly on that note, ready to drag (one UNDO step). Pointing at a key draws a thin line where that note sits on the display. Press PIANO again for the usual scale. CLEARING remembers it with your project. |
07SKETCH, peaks and MATCH
EQ SKETCH
Draw the curve you want and let CLEARING build it.
- Press SKETCH. BANDS appears under it: how many bands one stroke makes, 1 (the default) to 6.
- Drag across the spectrum in one stroke, drawing the curve you want: up to lift, down to dip. Draw only the part you want to change; the rest of the curve stays as it is.
- Let go. On BANDS 1, CLEARING places the one band that fits your line best: a bell as wide as the bump you drew, or a shelf when your line stays up or down at the very end. Small wobbles in your hand are ignored. Set BANDS higher (up to 6) to follow a more detailed line: shelves at the ends, bells for the bumps in between. They are normal bands, ready to fine-tune.
Draw again to add more. One undo (⌘Z / Ctrl+Z) takes a whole sketch away. Press SKETCH again to go back to editing dots.
Bands from the spectrum's peaks
Move the mouse along the gold spectrum and a ring marks the nearest peak. Click it for a band exactly on the peak (as narrow as the peak), then drag down to tame it. Cmd-click (Ctrl-click on Windows) moves the nearest band onto the peak instead.
EQ MATCH
Make this track's tone follow a reference: a mix you love, or the same instrument from another recording.
- Press MATCH. The MATCH card opens over the spectrum.
- Pick the reference: SIDECHAIN (play the reference into CLEARING's sidechain) or LOAD FILE (any WAV, AIFF, FLAC, MP3 or OGG file). The reference's spectrum appears as a pale blue line.
- Play this track (with the sidechain reference, if that is your choice) and press LEARN. Let a good, typical part play, then press LEARN again. A dashed line shows the curve MATCH will make.
- Press MATCH. CLEARING adds bands that bring this track's tone toward the reference. Overall loudness is left out: MATCH matches tone, not level.
- Set AMOUNT: all the way is the full match, less is a gentle nudge. It moves the matched bands live. Undo takes them away.
08Bands and shapes
CLEARING has 24 bands. Every shape has its own colour, used on its dot, its tab, its fill and its knobs.
| Type | What it does |
|---|---|
| BELL | Lifts or lowers a range around FREQ. Q sets how wide. |
| LOW SHELF · HIGH SHELF | Lifts or lowers everything below or above FREQ. Q sets the shape of the corner. |
| LOW CUT · HIGH CUT | Removes everything below or above FREQ, from a gentle 6 to a steep 96 dB per octave (SLOPE, which appears in the band strip only for LOW CUT and HIGH CUT). Q adds resonance at the corner. |
| NOTCH | A deep, narrow cut for a single ringing frequency. |
| BAND PASS | Keeps only the range around FREQ (for effects such as a telephone voice). |
| TILT | Tips the whole spectrum around FREQ: brighter and thinner, or darker and fuller. |
| AIR | A soft lift into the very top, for open, silky highs. |
| ALL PASS | Changes only the phase, not the level. Useful for lining up layered sounds. |
STEREO chooses which part of the sound a band works on: both sides, the left or right only, the middle (MID) or the sides (SIDE). A low cut on SIDE makes the low end mono; a high shelf on SIDE widens the top.
SOLO lets you hear only the area the selected band works on.
Each band keeps its true analog shape all the way to the top of the spectrum, with none of the narrowing many digital EQs show near 20 kHz, and adds no delay at all.
09Character
The pure curve. A band set to 0 dB leaves the sound exactly as it was.
The broad, interacting curves of passive mastering EQ: gentle bells are wider, a low-shelf boost brings the classic dip just above it, and a high shelf gets a soft lift near its corner.
What the band adds or takes away passes through a valve curve: warm, even harmonics.
A transformer's weight: the lows of the band gain density and soft odd harmonics.
TUBE and IRON only colour the part of the sound the band changes, so a band at 0 dB stays clean. Push a band a few dB and you clearly hear them: TUBE adds warm, even harmonics, IRON thickens the low end of the band.
CHARACTER: the colour of the whole EQ
CHARACTER in the OUTPUT section colours everything CLEARING does, after all the bands:
The default. Nothing is added: CLEARING stays perfectly transparent.
A transformer's touch: the lows gain a little weight and density, the rest only a trace.
A valve's glow: soft, even harmonics across the whole sound.
Both follow the music: loud passages get a little more colour, quiet ones stay almost clean. Both are level-matched, so switching CHARACTER changes the tone, not the volume. They are made at a raised sample rate inside CLEARING (with no added delay), so even the brightest material stays free of harsh fold-back, with OVERSAMPLE off as well.
10Dynamics and the sidechain
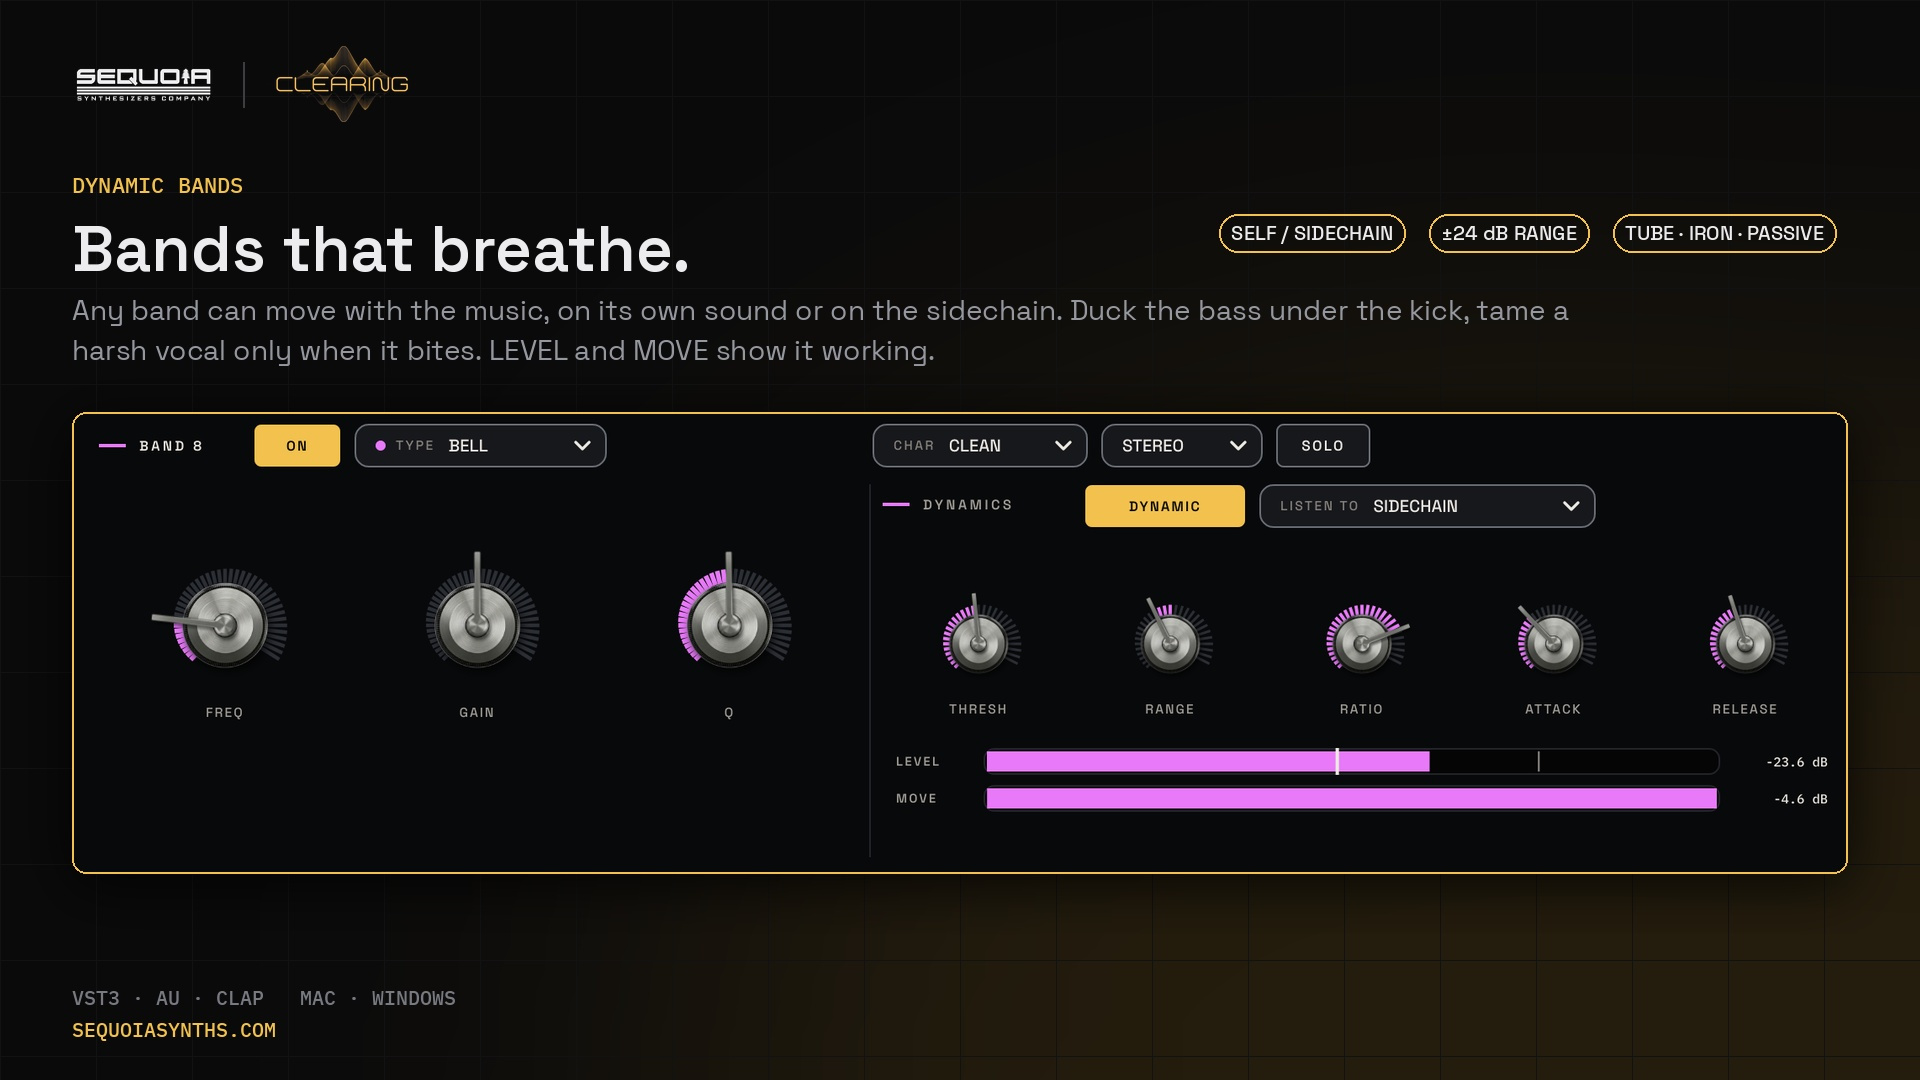
Turn on DYNAMIC and a band only moves when its frequencies get louder than THRESH. That tames a harsh moment without dulling the rest of the song.
DYNAMIC works on every shape with GAIN (BELL, the shelves, TILT, AIR, BAND PASS) and on LOW CUT and HIGH CUT. On a cut it moves the corner instead of the level: every 6 dB of RANGE is one octave, so with RANGE −12 a LOW CUT climbs up to two octaves while the low end is loud, then comes back. NOTCH and ALL PASS have no dynamics.
| Control | What it does |
|---|---|
| THRESH | The level where the band starts to move. With AUTO THRESH on, how far above the band's usual level it reacts. |
| AUTO THRESH | The threshold follows the band's own usual level, so the band only moves on what is louder than usual, however loud or quiet the track is. A band you make dynamic in the window starts with it on. Turn it off to set THRESH as a fixed level. |
| RANGE | The most it moves. Below zero it cuts when the sound gets loud; above zero it lifts. |
| RATIO | How strongly it reacts above the threshold. |
| ATTACK · RELEASE | How fast it reacts and how fast it lets go. |
| SPECTRAL | The band moves only the narrow peaks inside its area (see below). |
| SELECT | SPECTRAL only: how picky it is. Up: only the sharpest, most ringing peaks, a few of them, cut very narrow. Down: more peaks, a little wider. |
| LISTEN TO | SELF reacts to this track. SIDECHAIN reacts to the sound sent to CLEARING's sidechain input. |
The sidechain is how CLEARING makes room: put it on the bass, send the kick to its sidechain, and a dynamic band at the kick's frequency dips the bass only while the kick plays. The rest of the time the bass is untouched. The same works for a vocal against synths or guitars.
Under the dynamics knobs, LEVEL shows what the band hears right now, with a white mark at THRESH, and MOVE shows how far the band is moving, up to RANGE. To make it pump, set THRESH so the loud hits go past the mark and the quiet parts stay under it. A new dynamic band starts at RANGE −12 dB and RATIO 2, so it rides the music rather than sitting at a fixed cut. While a band moves, its dot also shows a line to where its gain is right now, and the GR meter shows the largest move.
SPECTRAL: only the peaks
A normal dynamic band moves its whole area. Turn on SPECTRAL and the band works like a set of tiny, precise hands instead: CLEARING keeps looking at the band's area and finds the narrow peaks that pass THRESH and stand out from the sound around them (a ringing snare, a harsh vocal resonance, one booming bass note). Each peak gets its own very narrow dip that follows it, with the band's RATIO, RANGE, ATTACK and RELEASE, and everything between the peaks is left exactly as it was. The band's own curve still applies as set.
You see it on the spectrum: the band's dot gets a dashed ring and its curve shows the little notches moving with the music. LEVEL shows the loudest peak in the area and MOVE the deepest dip. SPECTRAL works on BELL, the shelves, TILT, AIR and BAND PASS, adds no delay, and costs nothing while it is off. Turning SPECTRAL on also turns DYNAMIC on. It can listen to the sidechain too: then the peaks of the other sound make room in this one.
11FIND CLASHES and HIGHLIGHT
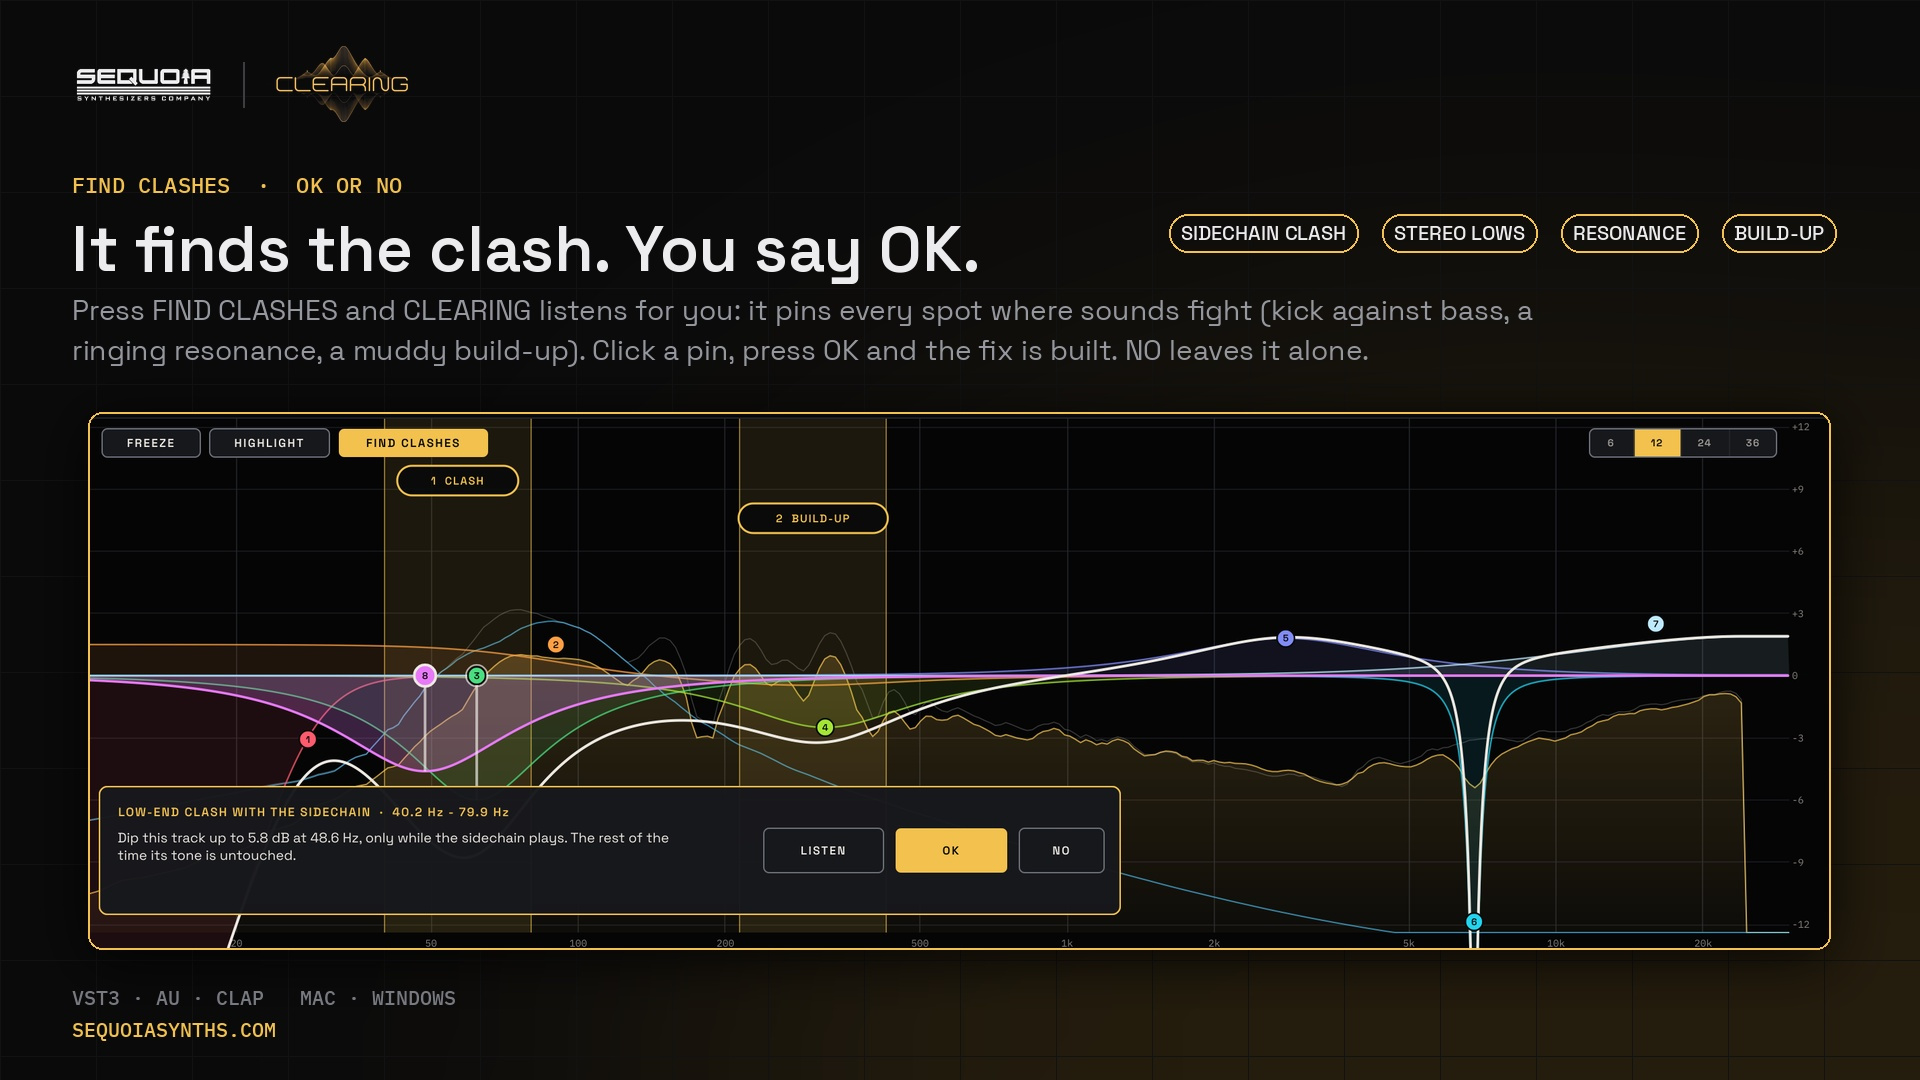
FIND CLASHES does the listening for you. Press it while the music plays and CLEARING checks the whole spectrum every second and a half, then pins up to five places where sounds fight, each with a number and what it is: CLASH (this track and the sidechain fighting), STEREO LOWS, RESONANCE or BUILD-UP. The worst comes first.
- Press FIND CLASHES and play the music. Pins appear over the places it finds.
- Click a pin. A card says exactly what it found and the fix it will make. LISTEN plays only that area.
- Press OK and the fix is added as a band, ready to fine-tune. Press NO and nothing changes; FIND won't suggest that spot again.
To check one place yourself, use HIGHLIGHT:
- Play the music. Press FREEZE at a moment that sounds crowded, if you like.
- Press HIGHLIGHT and drag across the area that sounds muddy, harsh or crowded.
- A card names what CLEARING found there and the fix it suggests. LISTEN plays only that area.
- Press OK to add the fix as a normal band (its dot is circled because it is dynamic), or NO to leave it.
| What it finds | The fix it suggests |
|---|---|
| A clash with the sidechain | A dynamic dip that listens to the sidechain, so this track steps aside only while the other sound plays. |
| Stereo lows | A low cut on the sides, so the low end is mono and solid. |
| A resonance | A narrow dynamic cut that only acts when the ring stands out. |
| A build-up | A broad dynamic cut that eases the area back when it gets thick. |
12SPECTRAL: the step sequencer
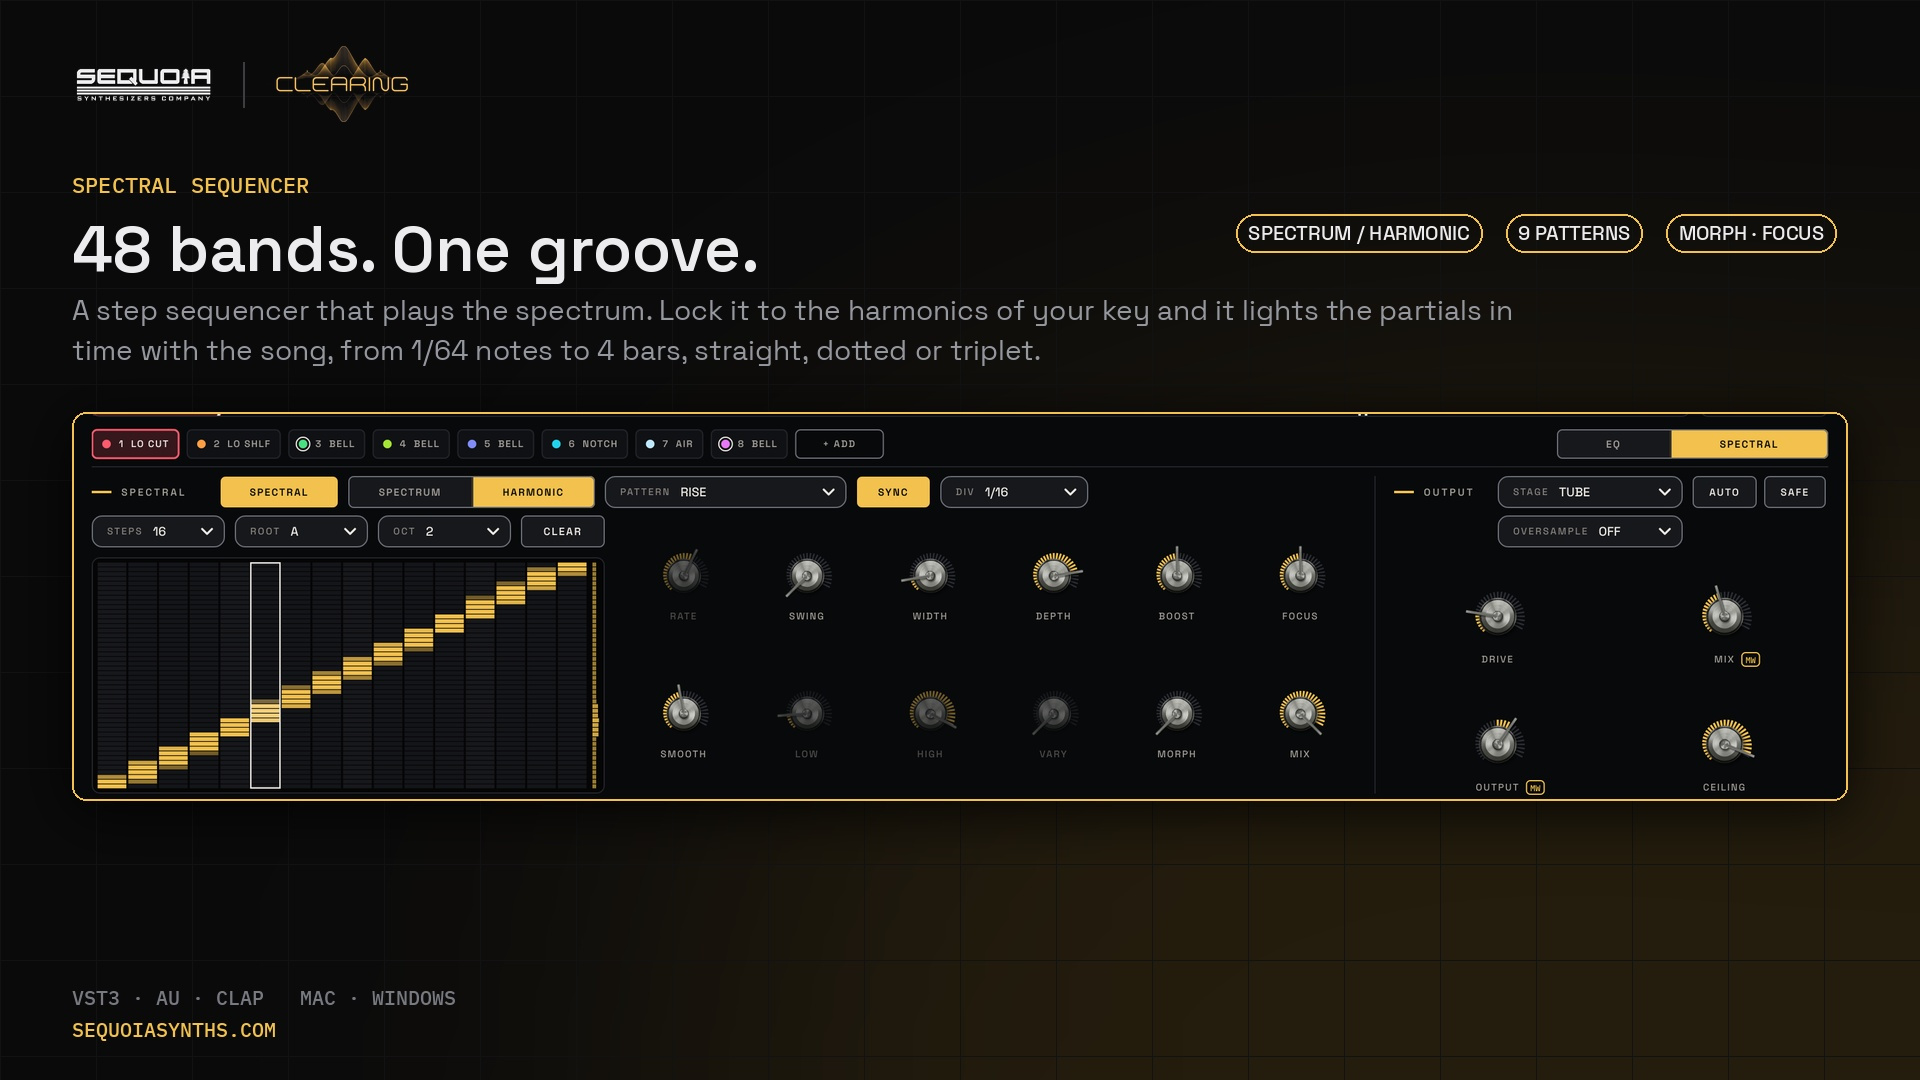
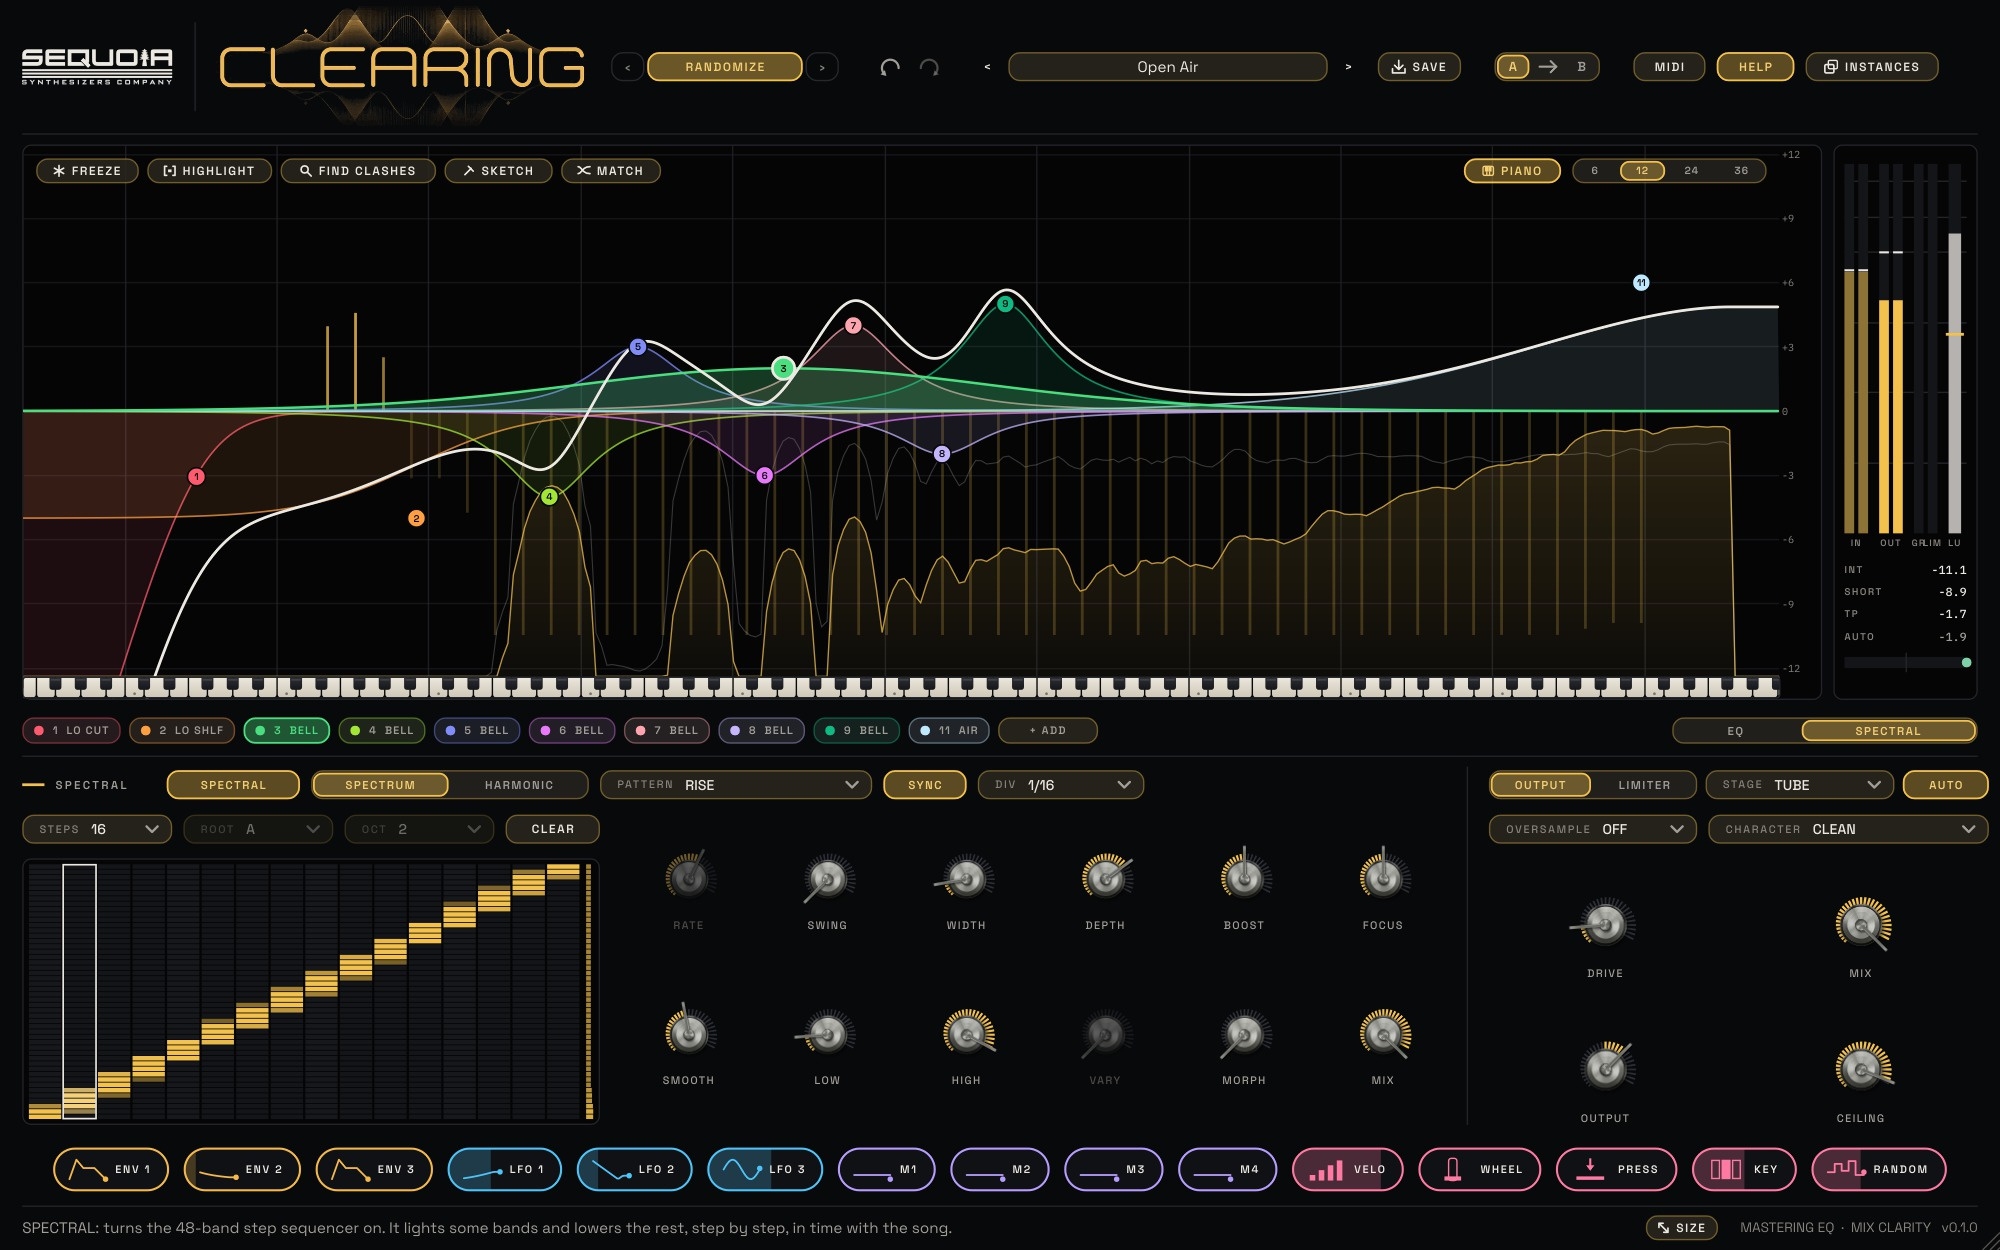
SPECTRAL is a 48-band step sequencer that plays the spectrum. On every step it lights some bands and lowers the rest, in time with the song, for rhythmic filtering, harmonic shimmer and moving textures. Click SPECTRAL in the EQ / SPECTRAL switch in the middle of the band-tab row to open its page (once you have so many bands that their tabs reach it, the switch moves to the right end). It starts switched off: click the grid or touch any of its settings and it turns on (or use the SPECTRAL switch). Every control can always be turned: touching RATE turns SYNC off, DIV turns it on, LOW / HIGH pick SPECTRUM and ROOT / OCT pick HARMONIC. Pick a band tab to go back to the EQ. While it plays, the spectrum shows each band as a gold line: bright when it is lifted, faint when it is lowered.
- Turn SPECTRAL on and press play. With the transport stopped it runs on its own at the song tempo.
- Pick a PATTERN and the speed with DIV.
- Set how strong it is with DEPTH (how far unlit bands go down) and BOOST (how much lit bands come up).
| Control | What it does |
|---|---|
| SPECTRUM · HARMONIC | SPECTRUM spreads the 48 bands evenly from LOW to HIGH. HARMONIC tunes them to the harmonics of a note (the note, twice it, three times it...), so the movement stays in key. |
| ROOT · OCT | The note HARMONIC is built on (HARMONIC only). |
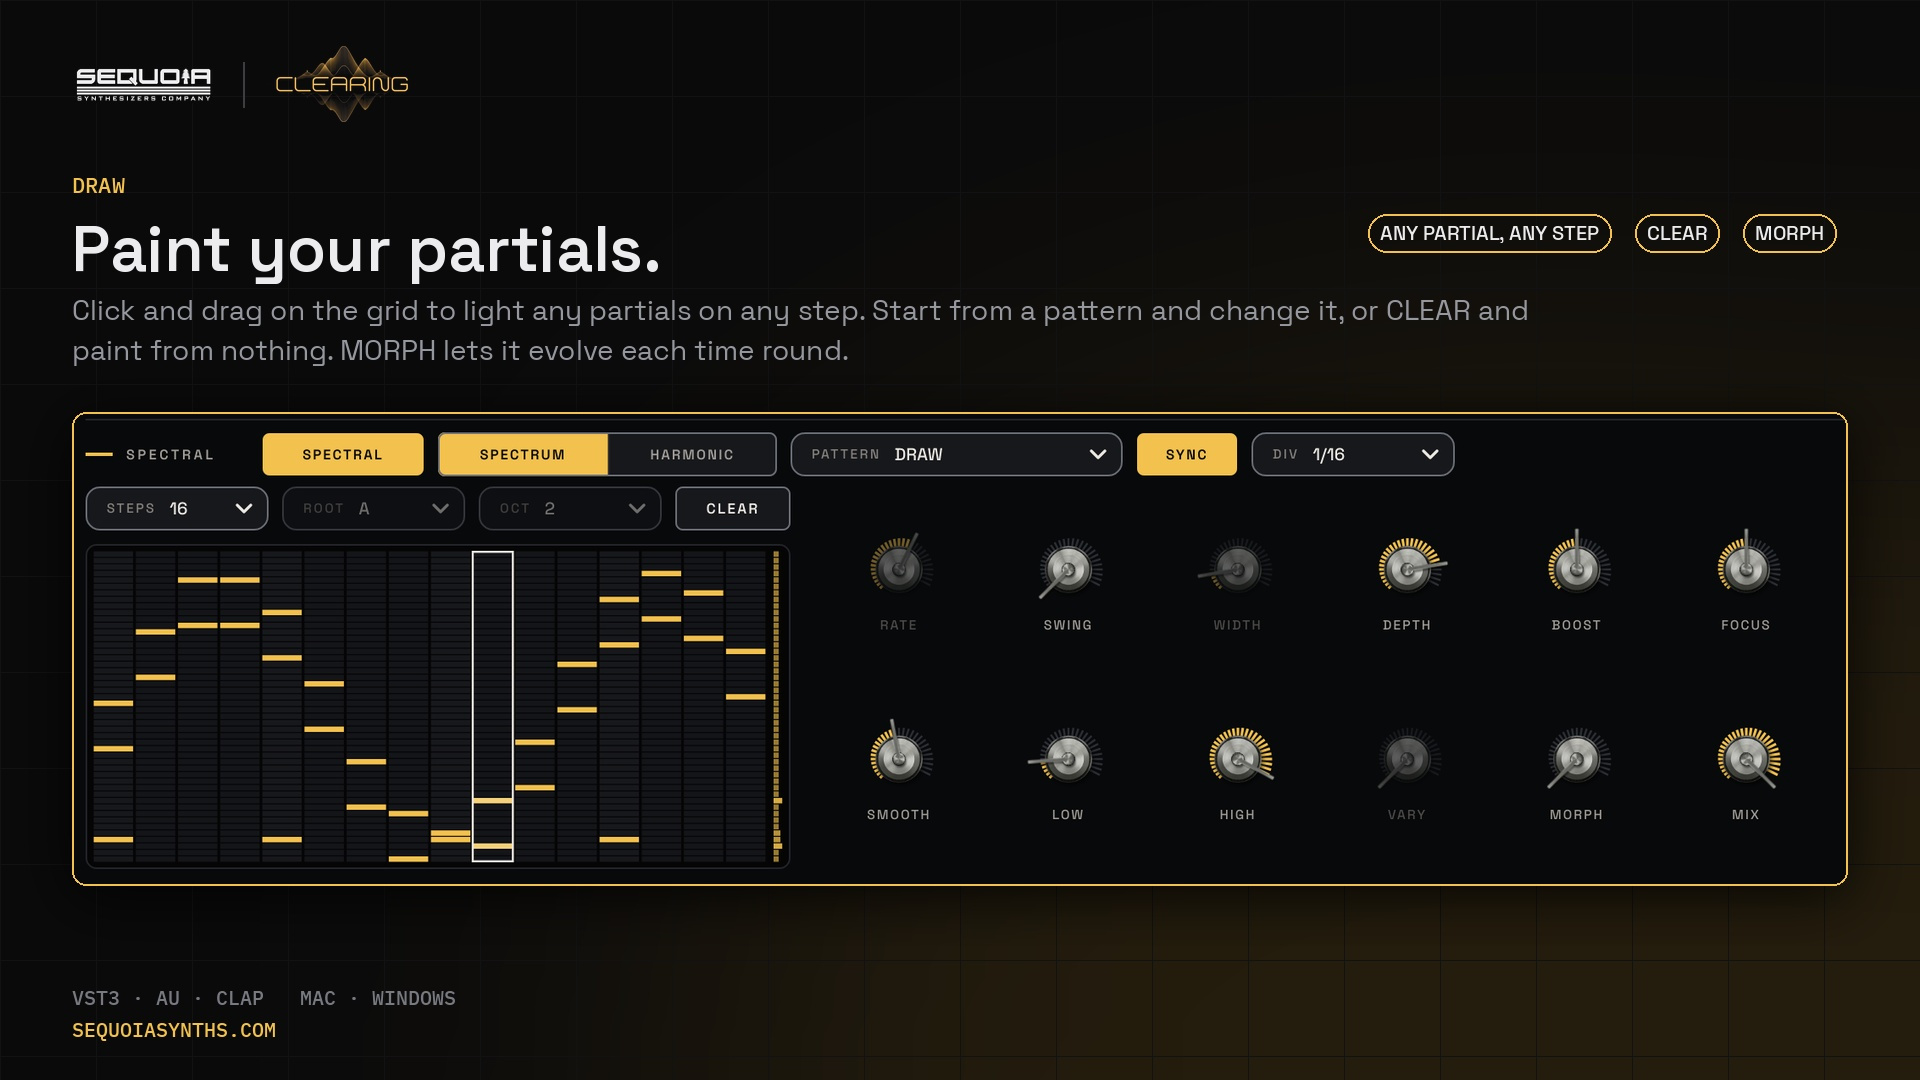
| PATTERN | How the light moves: RISE, FALL, BOUNCE, SCATTER, RANDOM, ODD/EVEN, CHORD, SPIRAL, or DRAW: your own sequence of partials, painted on the grid. |
| CLEAR | Empties the grid (every step silent, PATTERN set to DRAW) so you can paint from nothing. Undo brings it back. |
| The grid | Paint any partials on any step: click or drag to light cells, and start a drag on a lit cell (or right-click) to erase. Clicking a generated pattern turns PATTERN into DRAW, starting from exactly what you see, so you can take RISE or SPIRAL and change it. What you paint is saved with the sound. |
| STEPS | How many steps before the pattern repeats (2 to 32). |
| SYNC · DIV | With SYNC on, each step lasts one DIV of the song clock: 1/64 up to 4 bars, including dotted (D) and triplet (T) values. |
| RATE | Steps per second when SYNC is off. |
| SWING | Delays every second step for a shuffled feel. |
| WIDTH | How many neighbouring bands light up together. |
| DEPTH | How far the unlit bands go down. At 0 nothing is lowered. |
| BOOST | How much the lit bands come up (0 to 12 dB, 6 dB to start). |
| SMOOTH | How gently each band moves to its new level: short is choppy and rhythmic, long is a slow shimmer. |
| LOW · HIGH | The range the bands cover (SPECTRUM only). |
| VARY | A different version of SCATTER, RANDOM, CHORD, SPIRAL and MORPH. |
| MORPH | The chance that a step changes each time the pattern comes round: its partials slide to a new place for that pass. 0 repeats exactly; 100% morphs every step, every pass. |
| FOCUS | How narrow each band is. Turn it up and the lit partials ring out clear and bright; turn it down and they blend. |
| MIX | How much of SPECTRAL you hear. |
SPECTRAL adds no delay, and with DEPTH and BOOST at 0 (or MIX at 0) it leaves the sound exactly as it was. WIDTH, DEPTH, BOOST, MIX, RATE and SWING can all be modulated. Eight factory presets in the Spectral folder show what it can do.
13Output
| Control | What it does |
|---|---|
| STAGE | OFF is fully clean. TUBE adds a valve stage's warm even harmonics; IRON a transformer's weight. |
| DRIVE | How hard the stage is pushed. |
| CHARACTER | CLEAN, SUBTLE (transformer) or WARM (valve): the colour of the whole EQ, level-matched (see Character). |
| AUTO | Keeps the loudness the same while you EQ, so you judge the tone, not the volume. It follows the music you play and ignores the quick moves of dynamic bands. |
| MIX | The untouched sound against the full CLEARING sound. |
| OUTPUT | The final level. |
| CEILING | The highest peak that leaves CLEARING. The LIMITER holds it (it's on from the start, at −1.0 dBTP). |
Comp
The COMP tab is a compressor on the whole sound, the way most people use one on a mix bus or a master: it comes after every band and before OUTPUT, MIX and the LIMITER. It is off in every new CLEARING. Turn it ON, lower THRESHOLD until the GR meter shows a few dB on the loud parts, and set RATIO for how firmly it holds. It adds no delay.
| Control | What it does |
|---|---|
| ON | The compressor on or off. Its dials dim while it is off (you can still set them). |
| THRESHOLD | The level where it starts working, −48 to 0 dB. Lower squeezes more of the music. |
| RATIO | How hard it squeezes above the threshold, 1:1 to 20:1. 2:1 is gentle glue, 4:1 is firm, 10:1 and up is close to limiting. It eases in over a soft knee, so it never grabs harshly. |
| MAKEUP | Turns the compressed sound back up, 0 to +24 dB. |
| ATTACK | How quickly it clamps down, 0.1 to 100 ms. Slower lets the hits punch through; faster tames them. |
| RELEASE | How quickly it lets go, 10 ms to 1 s. Faster is louder and livelier; slower is smoother. |
| MIX | Blends the uncompressed sound back in under it (parallel compression). 100% is fully compressed. |
| AUTO GAIN | Puts back about the level the compressor takes away, so you can set THRESHOLD and RATIO by ear without it just getting quieter. |
Limiter
The LIMITER tab is a mastering limiter at the very end of CLEARING. It looks a few milliseconds ahead, so it turns a peak down smoothly just before it arrives instead of clipping it, and with TRUE PEAK on it also catches the peaks that form between the samples when the music is converted, so nothing goes over the ceiling on any player. It is on in every new CLEARING, set to −1.0 dBTP. The LIM column of the meter bar shows how hard it is working.
| Control | What it does |
|---|---|
| ON | The limiter on or off. While it's on it delays the sound by about 7 ms (your host lines everything up). |
| INPUT | Drives the music into the limiter (0 to +24 dB): louder and denser. Watch LIM: a few dB on the loudest hits is usually plenty. |
| CEILING | The highest peak let through, −12 to 0 dB (true peak with TRUE PEAK on). −1.0 is a safe choice for streaming. |
| ENHANCE | Gently rounds the very loudest peaks before the limiter, so it gets the same loudness with less limiting. 0 is off. |
| ATTACK | How quickly it clamps down ahead of a peak. Short keeps the punch of drums; longer is smoother on dense mixes. |
| RELEASE | How quickly it lets go. With AUTO REL on, the music sets it: quick after a single hit, slow under sustained limiting, so nothing pumps. |
| KNEE | Starts limiting gently just below the ceiling. 0 is a hard knee; higher is softer. |
| TRUE PEAK | Watches the peaks between the samples too (four times oversampled). Leave it on. |
| AUTO GAIN | While you set INPUT and ENHANCE, you hear the limiter at the loudness the music came in at, so you judge its sound and not its volume. Turn it off before you export. |
| SAFE | A last guard after the limiter: nothing passes the ceiling, whatever happens. |
| DITHER | For exporting at 16 or 24 bit: OFF, 16 BIT, 16 BIT SHAPED, 24 BIT, 24 BIT SHAPED. SHAPED moves the noise to where it's hardest to hear. Use it only when CLEARING is the last thing before the export. |
14Meters
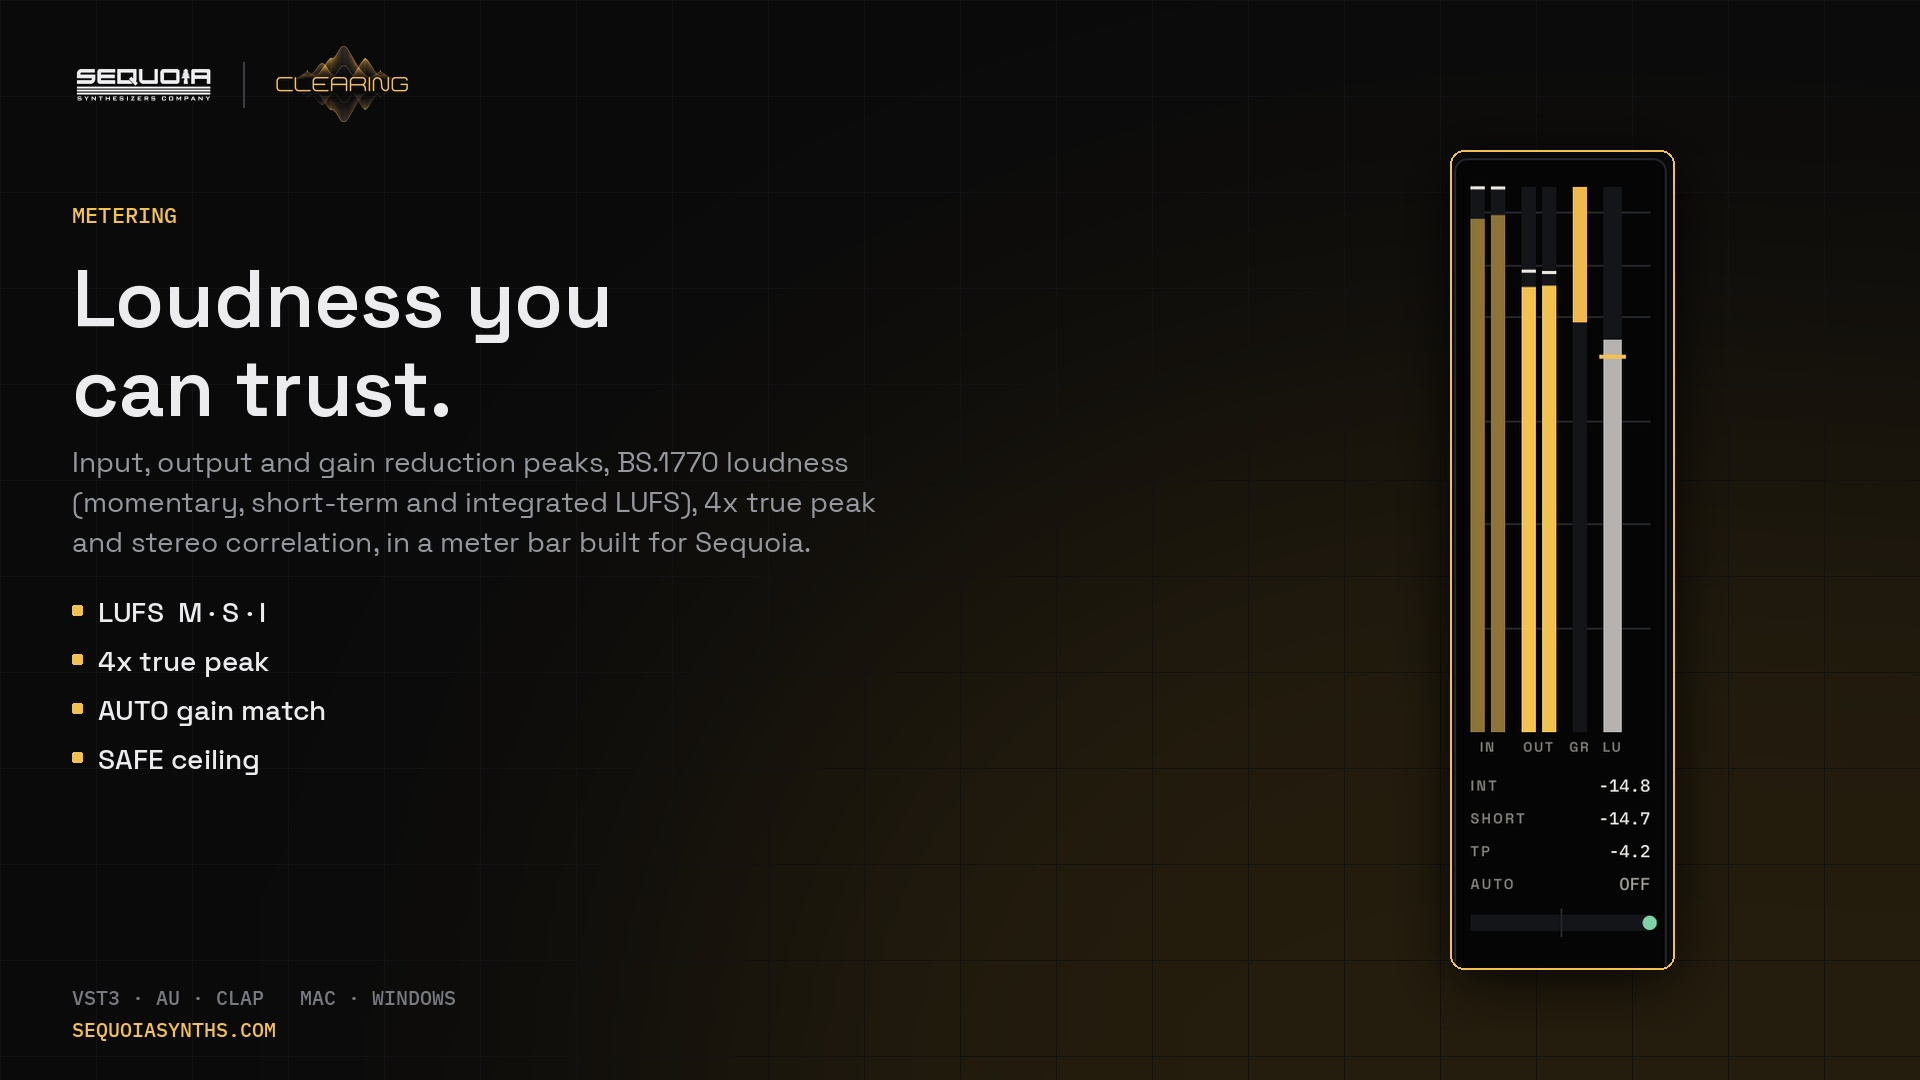
The bar on the right shows input (IN) and output (OUT) peaks on the LED ladder: square, domed LEDs in two rows, the left channel above the right, labelled +6, +3, 0, −3, −6, −9, −12, −15, −18, −21 and −24 dB. The LEDs are green up to −6, yellow at −3 and 0, and red at +3 and +6, so a red LED means the level is over full scale. A thin ring on a LED marks the held peak.
Below the ladders, gain reduction (GR for the dynamic bands and the COMP, 0 to 24 dB, and LIM for the limiter, 0 to 12 dB) and short-term loudness (LU, −60 to 0 LUFS, with a ring on the LED of the momentary loudness) are rows of domed LEDs too. They keep their own scales, so they carry no dB labels. In the dynamics section, LEVEL and MOVE use the same domed LEDs. Underneath: integrated loudness (INT), short-term (SHORT), true peak (TP, including the peaks between samples), how much AUTO is adjusting, and stereo correlation (left of centre means the mix would partly cancel in mono). Click the meter bar to restart the integrated loudness and the peak hold.
15Quality and latency
With OVERSAMPLE OFF and the LIMITER off, CLEARING adds no delay at all; the limiter adds about 7 ms of look-ahead while it's on. 2X and 4X run it at two or four times the sample rate for the cleanest TUBE, IRON and STAGE saturation at the top end; they add a few samples of delay, which your DAW compensates automatically. MIX stays perfectly lined up in every mode.
CHARACTER and SPECTRAL add no delay in any mode: CHARACTER makes its colour at a raised sample rate on its own, and SPECTRAL finds the peaks and then dips them with ordinary filters.
Bands that are off use no processing at all.
16Modulation
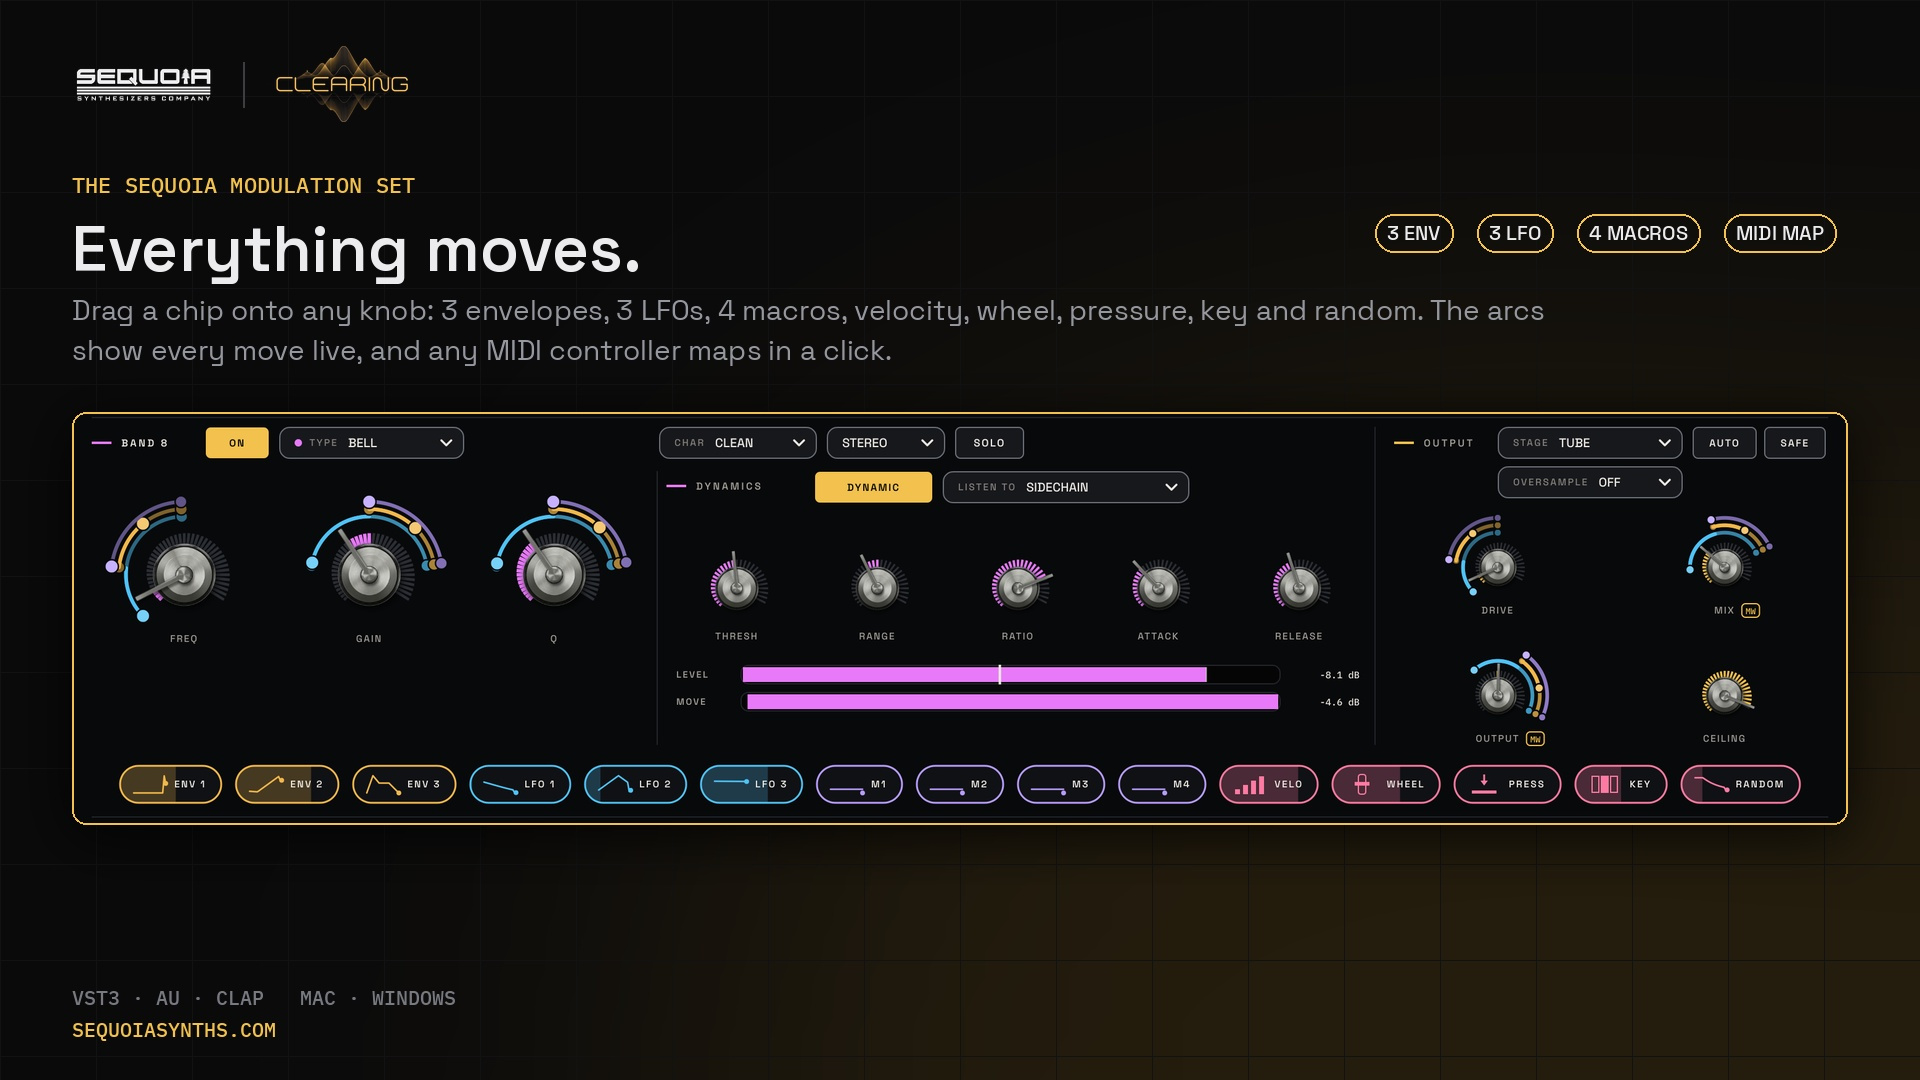
Drag a chip onto FREQ, GAIN or Q of any band, or onto DRIVE, MIX or OUTPUT, or SPECTRAL's WIDTH, DEPTH, BOOST, FOCUS, MORPH, MIX, RATE or SWING, to make it move. A coloured arc appears around the knob; drag its two dots to set how far it moves up and down. Each dot moves on its own: the knob and the other dot stay where they are, unless you push a dot past the knob, which then moves with it. Pressing anywhere on the arc grabs its nearer dot; only the knob itself turns the knob. Click a chip to shape it (ENV and LFO cards), or Shift + right-click a knob for "Modulate with".
Up to three per knob. Each knob takes up to three modulations; drop a fourth chip and the help bar asks you to remove one first (Shift + right-click the knob). They stack in the order you added them, the first one closest to the knob, and their dots never sit on top of each other, so you can always grab the one you want. For a one-way source (ENV, the macros, VELO, WHEEL, PRESS) the start dot sits on the knob: pulling it toward the other dot does nothing, and pulling it the other way, past the knob, brings the knob along. Where space is tight, a knob with two or three arcs draws its dial a little smaller to make room, and grows back when you remove them. Both dots of every arc can be automated from your DAW (Mod 1 Amount and Mod 1 Down, and so on).
Even arcs. A two-way chip (LFO 1–3) swings both up and down, so when you drop one on a knob it gets the same room on both sides: the two end dots sit the same distance from the knob, even when the knob is not in the middle. If the knob is close to an end (within 10%), it can only move one way, so the arc keeps its full depth. One-way chips (ENV, the macros, VELO, WHEEL, PRESS) are unchanged. Dropping the same chip on the same knob again evens it the same way. Projects and presets you saved earlier keep their arcs exactly as they were. To even out an arc later, Shift + right-click the knob and choose Mirror the two ends next to that chip: both ends become the average of the two, shrunk to fit around the knob, never below 10%.
ENV 1 follows your input by default, so a band can open with every hit. VELO, WHEEL, PRESS and KEY need MIDI sent to CLEARING.
17MIDI MAP
Click MIDI to move any control with a MIDI controller. Pick a source (a knob, the mod wheel, aftertouch), press + ADD and choose a destination, or use CUSTOM and touch the control. Shift + right-click any knob for "Map to MIDI". Mappings are saved with your project, not with presets.
18A / B, undo, size and presets
A / B (in the header, right of SAVE). Two complete settings to compare. The lit letter is the one you hear: click the other letter to switch. The first time you click B it starts as a copy of A. The arrow between them copies the lit setting into the other one; right-click it for "Copy A to B" or "Copy B to A". Both are saved with your project, never in presets, and switching never clicks.
UNDO / REDO (the raised keys with curved arrows left of the preset name; they sink when pressed and grey out when there is nothing to undo or redo). ⌘Z undoes and ⇧⌘Z redoes (Ctrl+Z, Ctrl+Shift+Z or Ctrl+Y on Windows); Undo and Redo also sit at the top of every right-click menu. A whole knob turn is one step, and so are a preset load, INIT, an A / B switch or copy, a RANDOMIZE roll and a MIDI MAP change. Up to 100 steps; the help bar names each one. Automation from your DAW is never undone.
Right-click a knob to step it back (up to 10 times). Each knob remembers its own last 10 settings; loading a preset starts them afresh. Shift + right-click a knob for its menu (Undo / Redo, Map to MIDI, modulation).
SIZE (bottom right, beside the version). SMALL, MEDIUM, LARGE or EXTRA LARGE, or FIT TO SCREEN. You can also drag the bottom-right corner. The whole window scales as one picture, so nothing moves around. Your project remembers its size, and new windows open at the size you used last.
The preset menu: click the preset name. A dropdown opens under it: one sub-menu per category, then MY PRESETS (the ones you saved), then Init: a fresh start, Load a preset file… and Show my presets folder. Pick one and it loads at once (one undo step). ‹ and › beside the name step through every preset.
SAVE in the header opens SAVE PRESET: type a name and click the tags that fit. The first tag is the category it is listed under.
RANDOMIZE reshapes the bands that are on, moving them along the spectrum and changing gain, width and character, and never lifts the curve more than 6 dB (9 on WILD). Right-click it for MILD, MEDIUM or WILD and to lock sections. ‹ BACK and FORWARD › step through your rolls, and every roll is one undo step.
19Instances
Press INSTANCES in the header to see every CLEARING open in this session, each with a small picture of its curve over its sound.
| Do this | To |
|---|---|
| Double-click a name | Rename it. A CLEARING starts with its track's name when your DAW tells it, and the name is saved with the project. THIS ONE marks the CLEARING you are looking at. |
| EDIT | Show that CLEARING's curve and spectrum in this window's display, and edit it right here: drag its dots, add bands, click its peaks, SKETCH. EDITING and its name show in the display. FIND CLASHES, HIGHLIGHT and MATCH wait until you come back. BACK TO THIS ONE returns. |
| COPY · PASTE | Copy a whole curve (every band, dynamics included) and paste it onto any CLEARING in the list. Undo in that CLEARING takes it back. |
The list follows CLEARINGs being added and closed. If the one you are editing is closed, the display comes back to this one by itself.
ALL TRACKS: mix every track from one display
Press ALL TRACKS above the spectrum. Every other CLEARING in the session appears on this display at the same time, each in its track's colour: its sound as a thin line, its EQ curve dashed, and its dots. The button counts them (ALL TRACKS 3). Your own bands stay on top and work as always.
| Do this | To |
|---|---|
| Drag another track's dot | Move that band's frequency and gain on that track, from here. SHIFT for fine moves, ALT for frequency only. Undo in that CLEARING takes it back, and the DAW can record it as automation. |
| Scroll on another track's dot | Change that band's Q. |
| Hover a dot | The help line names the track, the band, its type, frequency and gain. |
| Click a name along the bottom | Hide or show that track on the display. |
Use it to make room: see where the kick and the bass pile up, or where the keys sit on the vocal, and move either one without opening another window. CLEARINGs find each other when your DAW runs them in the same process. If yours runs each plug-in in its own process, set CLEARING to share one.
20Presets and files
CLEARING comes with 80 factory presets of 10 kinds, built in. Click the preset name for the preset menu (see A / B, undo, size and presets): the presets are listed by kind. The arrows step through every preset in turn.
| Kind (tag) | Presets | For |
|---|---|---|
| Master | 10 | Finished mixes: open air, warmth, de-harsh, mono bass, streaming-ready ceilings. |
| Mix Bus | 8 | Glue, air, mud removal, mid focus and side shine on groups and busses. |
| Drums | 10 | Kick, snare, hats, toms, overheads, rooms and the drum bus. |
| Bass | 7 | Sub focus, pick definition, 808s, DI warmth, ducking under the kick. |
| Vocal | 9 | Clear leads, de-essing, air, warmth, backing vocals, rap presence. |
| Guitar | 5 | Acoustic sparkle, electric body, fizz cut, sitting under the vocal. |
| Synth & Keys | 8 | Leads, plucks, pads, piano, Rhodes and organ. |
| Clearing | 9 | The sidechain room-makers: send the other sound to the sidechain and this track steps aside only while it plays. |
| Spectral | 8 | The step sequencer: harmonic climbs, chords, shimmer, morphing partials. |
| Creative | 6 | Telephone, lo-fi radio, underwater, breathing filters, wide sides. |
Every factory preset sits at about the same loudness as the others (within about 3 dB on typical music), so you can step through them and compare the tone, not the volume. The few that cut a lot away, such as Radio, Telephone and Lo-Fi Radio, raise OUTPUT to make up for it.
Presets you save yourself go in Music/Sequoia Synthesizers/CLEARING/Presets on a Mac and Documents\Sequoia Synthesizers\CLEARING\Presets on Windows (sub-folders are fine), with the tags you gave them; they show under USER. Favourites are kept in Favourites.txt beside that folder. Copies of the factory presets that earlier versions put in that folder move into a hidden _old factory presets folder, so nothing shows twice.
21Recipes
- CLEARING on the bass, kick to the sidechain.
- Press FIND CLASHES, click the CLASH pin, then OK.
- Or load Clearing – Sub Under Kick.
- CLEARING on the synth or guitar bus, vocal to the sidechain.
- A dynamic bell at 2–4 kHz on MID, LISTEN TO SIDECHAIN.
- Low cut at 20–30 Hz, LOW SHELF +1 dB PASSIVE.
- AIR at 16 kHz +2 dB, STAGE TUBE, a little DRIVE, AUTO on.
- SPECTRAL on a pad, HARMONIC, ROOT = the song's key.
- PATTERN RISE, DIV 1/16, SMOOTH 80 ms, BOOST 4 dB.
- LOW CUT on SIDE at 100–150 Hz.
- Watch the correlation dot stay right of centre.
22Troubleshooting
| If | Then |
|---|---|
| A SIDECHAIN band never moves | Route a track into CLEARING's sidechain input in your DAW. The pale blue line on the spectrum shows when it arrives. |
| HIGHLIGHT says nothing is playing | Press play and let the music run for a few seconds, then highlight again. |
| It got louder and I can't tell if it's better | Turn on AUTO. |
| VELO, WHEEL, PRESS or KEY don't move anything | They need MIDI sent to CLEARING from your DAW. |
| MATCH says there is no reference | With SIDECHAIN, the reference must reach CLEARING's sidechain while LEARN is on (the pale blue line shows it). Or use LOAD FILE. |
| A SPECTRAL band never moves | Lower THRESH, or turn SELECT down so it accepts smaller peaks. It only acts on narrow peaks; a broad build-up is a job for a plain DYNAMIC band. |
| The CPU meter is high | Set OVERSAMPLE to OFF. Bands that are off cost nothing. |
23Credits
Interface type: Space Grotesk and IBM Plex Mono (SIL Open Font License).