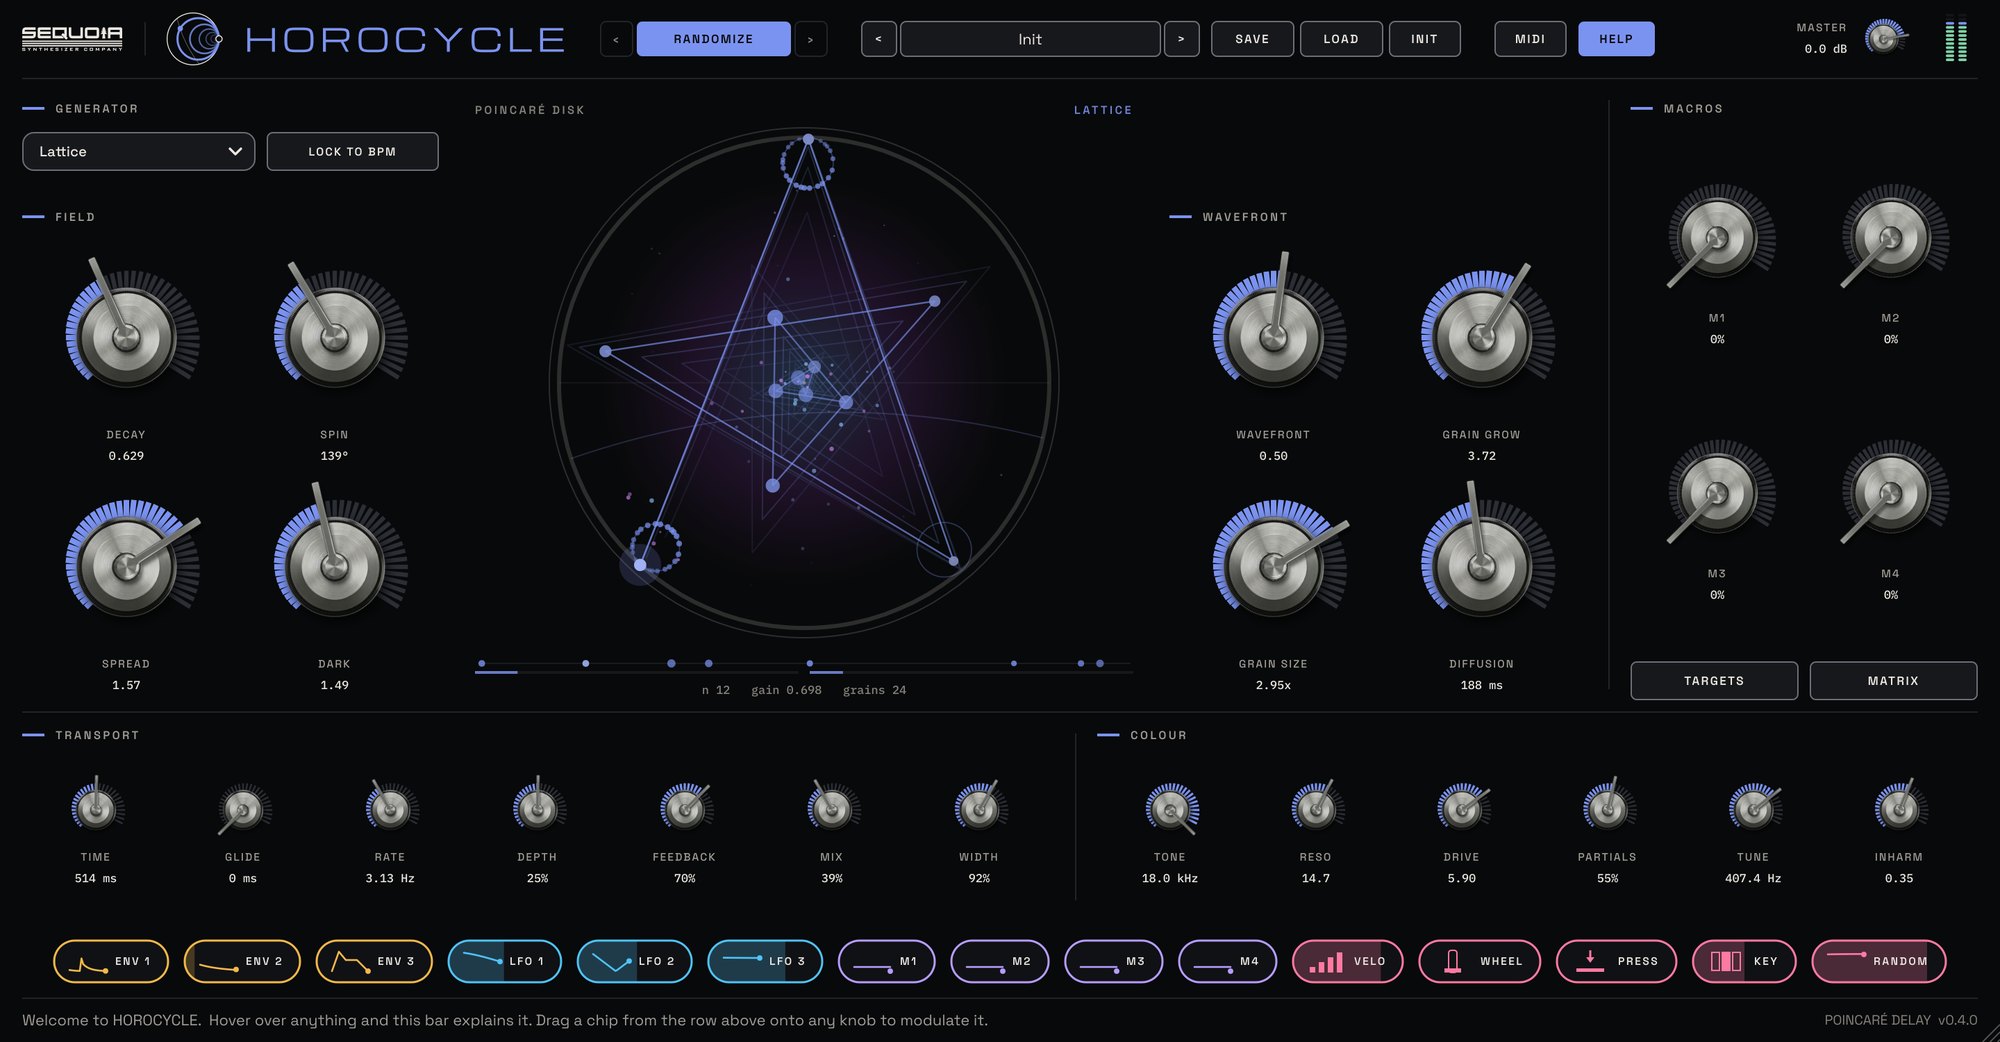
Quick start
HOROCYCLE works like a delay you already know, with one extra idea: DECAY moves the echoes across the disk instead of only fading them.
- Pick a Generator. Spiral fades evenly and is the easiest place to start. Lattice wanders.
- Set Time and Feedback the way you would on any delay. Click Lock to BPM to snap the time to your song.
- Bring Decay up from the bottom. At its lowest you have a clean delay; as it rises the echoes scatter in time and across the stereo field.
- Shape the colour of the tail with Tone, Dark and Reso.
- Not sure where to go next? Press Randomize. The
‹arrow beside it takes you back.
Rest the mouse on any control and the help bar at the bottom of the window explains it in one sentence. With Help lit, a tip card appears as well.
Installing and setup
- Formats: VST3, AU (Mac) and CLAP. Mac and Windows.
- Mac: run the installer. The plugins go to your system plugin folders. Then rescan plugins in your DAW.
- Windows: run the installer. The VST3 and CLAP versions go to the standard plugin folders. Then rescan plugins in your DAW.
- Where it goes: HOROCYCLE is an audio effect. Put it on any track or bus with audio coming in.
HOROCYCLE accepts MIDI, which feeds the Velo, Wheel, Press and Key chips, note-triggered envelopes and the MIDI MAP. An audio track carries no MIDI. To play it from your keyboard, place HOROCYCLE on the instrument track, after the synth, and arm that track, or route your controller's MIDI to it in your DAW.
The window
| Area | What it does |
|---|---|
| Header | The HOROCYCLE name, ‹ Randomize ›, Undo and Redo, the preset bar (< >, the preset name, Save), A / B, MIDI, Help, Master and the output meter. |
| Generator | The path the echoes follow across the disk, and Lock to BPM. |
| Field | How the echoes travel: Decay, Spin, Spread, Dark. |
| Poincaré disk | The live field. Dots are echoes (the brightest is the newest) and rings are their grain circles. The readout underneath shows the echo count, the current gain and the number of grains. |
| Wavefront | The grains: circle size, how many, how long, and how far apart in time. |
| Macros | Four performance knobs, M1 to M4, with Targets and Matrix. |
| Transport | Time and movement: Time, Glide, Rate, Depth, Feedback, Mix, Width. |
| Colour | Tone and character: Tone, Reso, Drive, and the resonator bank Partials, Tune, Inharm. |
| Chip row | Fifteen modulation sources. Drag one onto a knob to modulate it; click one to shape it. |
| Help bar | One plain sentence about whatever the mouse is over. Size and the version are on the right. |
Every knob shows its name underneath; point at it or turn it and the name changes to its value. Drag up or down to turn it (150 pixels covers the whole range), hold Shift for fine control, double-click to reset, or use the mouse wheel. Right-click any knob for Undo, Redo, Modulate with and Map to MIDI.
Generator
Each echo is one step of a movement across the disk. The generator decides what kind of movement. Echoes near the centre are loud and bright; as they travel toward the rim they get quieter and darker. Which way an echo faces decides where it sits in the stereo field.
| Generator | Movement | How it sounds |
|---|---|---|
| Spiral | A straight push outward | The core sound. An even, smooth fade that darkens steadily. |
| Orbit | Circles around a point | The echoes never drift away, so they sustain and the tone breathes. The freeze and sustain mode. |
| Creep | A slow slide toward the rim | Fades far more slowly than a normal delay. A very long tail. |
| Lattice | A random walk across a tiling | Repeats wander, and sometimes swell back. |
| Never Twice | Two movements, taking turns | Never repeats exactly, with two interleaved fade slopes. |
| Split Worlds | Two separate fields | One field per side. Wide and enveloping. |
Snaps Time to the nearest note length of your song's tempo.
Field
How far each echo travels across the disk. Low is a clean delay; high scatters the echoes in time and space.
How far each echo turns around the disk. At 180° it is plain ping-pong, left and right. Every other angle circles around the stereo field instead.
How wide each cluster of grains sits in the stereo field.
How quickly later echoes lose their brightness.
Wavefront
Every echo splits into a small circle of grains, a horocycle. These controls shape that circle.
The size of the circle each echo splits into. Large settings smear the grains across the whole field.
How many more grains each new echo breaks into.
Grain length compared with Time. At 2× the echoes are smooth; below 1× they break into fragments.
How far apart in time the grains of one echo land.
Transport
The gap between echoes. Changing it crossfades smoothly, with no zipper noise.
How slowly the echoes slide to a new Time. Turn it up for tape-style pitch bends.
Speed of the wobble on the delay time.
How far the wobble moves the delay time. Small amounts give chorus; large amounts bend pitch.
How much of each echo comes back. Above 100% the tail holds and slowly saturates.
Dry signal only (0%) to echoes only (100%).
How far across the stereo field the echoes spread.
Colour
The brightness of the first echo. Later echoes get darker from here.
A peak at the Tone frequency inside the feedback loop. High settings make the echoes sing.
Warm saturation on the echoes.
Blends in a bank of ringing resonators tuned by Tune.
The pitch the resonators ring at.
Stretches the resonators away from a pure harmonic series, toward bells and metal.
Final output level, in the header. The meter turns blue near full scale and red when it clips, and CLIP lights beside it. The output never goes above −0.2 dBFS.
Modulation
Twenty-one knobs can be moved by modulation: everything in Field, Wavefront, Transport and Colour. The sources sit in one row along the bottom of the window.
Route a source
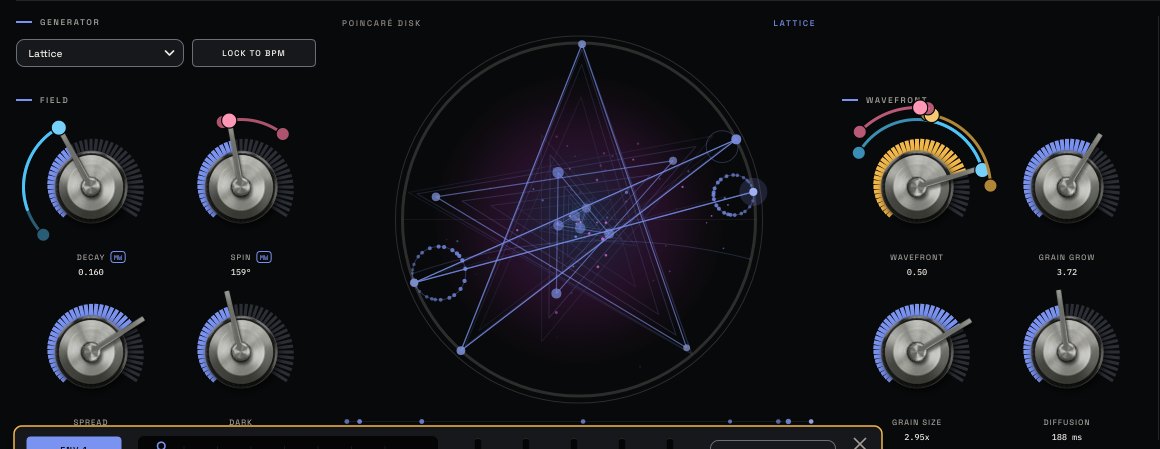
- Drag a chip onto a knob. A dashed ring in the chip's colour shows where it will land. Drop it, and an arc appears around the knob.
- Set how far it moves. The arc has a dot at each end, and each dot moves on its own, further out or back in. Dragging a dot never moves the knob or the other dot. The one exception: pull a dot past the knob's pointer and the knob follows that dot, while the other dot still stays where it is. Hold Alt and drag the knob to change the amount without touching the dots one by one.
- Watch it move. While the source runs, the knob's pointer and lit spokes follow the modulation live, a bright stretch and dot ride along the arc, and a small tick marks where the knob itself is set. Point at the knob to see your setting in place of its name.
| Source | The two dots |
|---|---|
| Two-way: LFO 1–3 | The top dot sets how far the source pushes the knob up, the bottom dot how far it pulls it down. They are separate amounts, so an LFO can reach far up and only a little down. While you drag the bottom dot, the name under the knob shows its amount as DN. |
| One-way: ENV, M1–M4, VELO, WHEEL, PRESS, KEY, RANDOM | The sweep starts where the knob is set, so the start dot sits on the knob: pulling it toward the far dot does nothing, and pulling it the other way, past the knob, brings the knob along while the far dot stays put. The far dot moves freely, even past the knob to make the source pull the knob down, and never moves the knob. |
Sliders take chips too. Drop a chip on the A H D S R sliders in the ENV window and a thin lane appears beside the slider in the source's colour, with a dot at each end: drag either dot to set how far it reaches that way, just like a knob's arc. While the source moves it, the slider's cap rides the live value and a small tick marks where you set it. Up to three per slider; an ENV can't move its own window's sliders.
Up to three per knob. Each knob takes up to three modulations; drop a fourth chip and the help bar asks you to remove one first (right-click the knob). They stack in the order you added them, the first one closest to the knob, and their dots never sit on top of each other, so you can always grab the one you want. Where space is tight, a knob with arcs draws its dial a little smaller to make room, and grows back when you remove them. Both dots of every arc can be automated from your DAW.
To put a two-way source's dots back to even, right-click the knob and choose Mirror the two ends. New routings, and presets and sessions saved before this change, start mirrored, so they sound exactly as before.
See what a source moves
- Click a chip and every knob it moves lights its spokes in the chip's colour. The help bar lists them: “LFO 1 moves 2 controls: DECAY, WAVEFRONT.”
- Hover a chip for the same view at half strength.
- Click a modulated knob and its source's card opens.
- Remove a routing: right-click the knob and choose Remove, or use the Matrix. Modulate with › on the same menu adds a source without dragging.
HOROCYCLE holds up to 32 routings. Every routing is saved with your presets and your project.
Envelopes · ENV 1–3
Click an ENV chip to open its card. Drag the dots on the curve, or use the A H D S R faders. The tabs on the left switch between the three envelopes.
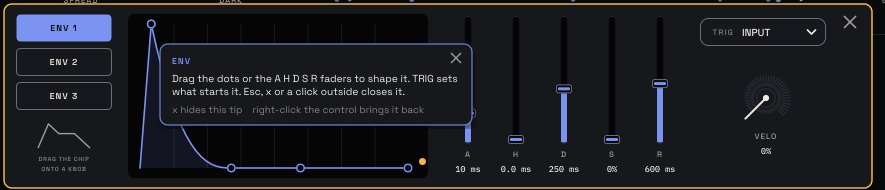
What starts the envelope: a MIDI note, the song's beat, or INPUT, your sound getting loud. ENV 1 starts on INPUT, so the echoes react to your playing straight away.
Rise time, time at the top, and fall time to the sustain level.
The level held while it is triggered, and the fade at the end.
How much a harder note, or a louder input, makes the envelope bigger.
Defaults: ENV 1 on INPUT (fast attack, short decay), ENV 2 on 1 BAR, ENV 3 on NOTE.
LFOs · LFO 1–3

The wave the LFO draws. S&H steps to a new random level each cycle; RANDOM glides between them.
How fast it moves. With Sync on, it follows a note length of the song tempo instead, including triplets and dotted values.
Restarts the wave from the beginning on every new note, and every time ENV 1 is triggered.
Rounds off corners. A square becomes a soft pulse, then a gentle wave. On S&H it softens the edges of each step more as you turn it up, and the flat tops stay flat.
Bends the shape in the way the morph type chooses. It starts in the middle; turn it either way. With BEND, right curves the wave outward and left curves it inward.
How Morph bends the wave. Random rolls a new type and variation, and the help bar names it.
After every new note, the LFO grows from nothing to its full height over this time. The arc on each knob still sets how far it travels; Rise sets how quickly it gets there.
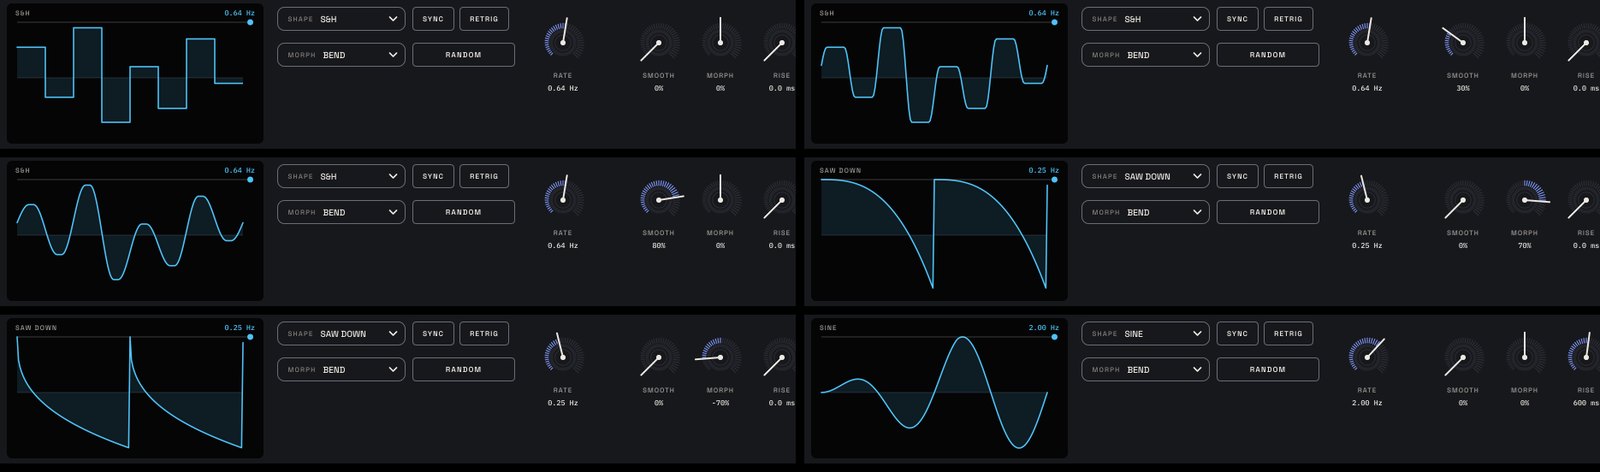
| Morph type | Turn right (+) | Turn left (−) |
|---|---|---|
| BEND | Curves outward | Curves inward |
| SKEW | Leans the midpoint later | Leans it earlier |
| SPIKE | Sharper peaks | Fatter peaks |
| MIRROR | Folds into a double bump, either way | |
| SYNC | Restarts the wave up to four times a cycle | |
| FOLD | Wavefolds the shape | |
| STEPS | From 24 steps down to 3 | |
| RIPPLE | Adds 2 to 6 ripples | |
| MUTATE | Two random types chained together | |
Defaults: LFO 1 SINE at 0.25 Hz, LFO 2 TRI at 1 Hz, LFO 3 RANDOM at 0.08 Hz.
VELO, WHEEL, PRESS, KEY and RANDOM
How hard the last note was played.
Your controller's mod wheel. The chip's fader icon follows it.
How hard you push down on a key after it is down. Playing a note alone does nothing. It reads channel and polyphonic aftertouch and drops back to zero when you let go of every key.
Which note you played, low to high.
A new random value every two seconds, gliding. Needs no MIDI.
These four chips need MIDI coming into HOROCYCLE. Until some arrives, hovering, clicking or dropping one of them says so in the help bar. See Installing and setup. Many keyboards' keys don't send aftertouch at all; on some controllers only the pads do.
Macros and matrix
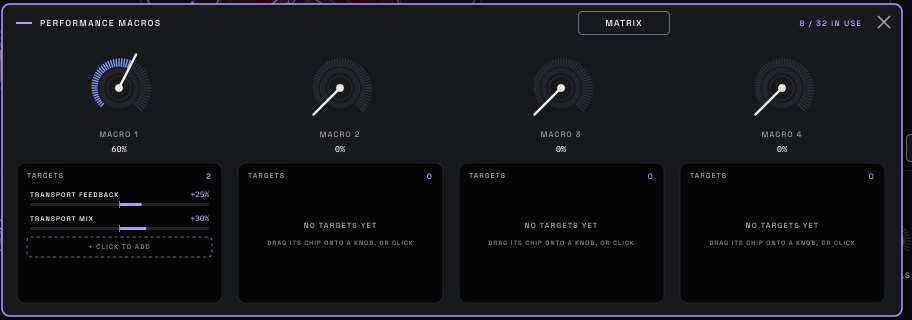
The four Macro knobs on the right are one-knob performance controls. Each moves every control you route it to, by its own amount.
- Route a macro: drag its chip (M1 to M4) onto knobs, or click Targets and use + Click to add.
- Targets opens the Performance Macros card: every macro with its targets and amounts.
- Matrix lists every routing in the plugin, all 32 slots, with source, destination and amount. When an LFO's two ends are set apart, its down amount shows under the amount as
DN.
MIDI MAP
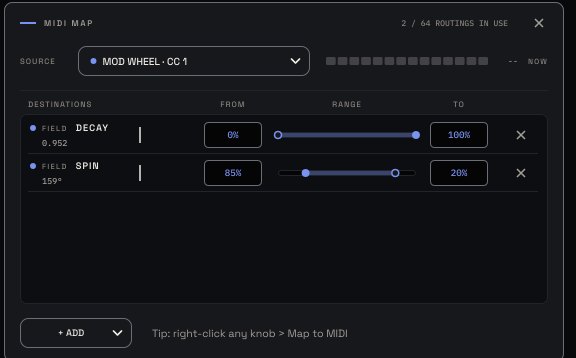
The MIDI MAP lets a hardware control move any knob directly, each over its own range. Click MIDI in the header to open it.
- Pick a Source: mod wheel (CC 1), aftertouch, breath (CC 2), foot (CC 4), expression (CC 11), sustain (CC 64), resonance (CC 71), brightness (CC 74), general 1–4 (CC 16–19), or Learn… and move a knob on your controller. The NOW meter shows the source live.
- Click + Add to choose a destination, or Custom… and touch any control in the window.
- Set From and To for each destination. Reverse them to turn the knob down as the control goes up.
Shortcut: right-click any knob, Map to MIDI. Mapped knobs show a small tag next to their name, such as MW or CC74. Mappings are saved with your project, not in presets.
The MIDI MAP and the Wheel chip are two different tools. The MIDI MAP turns the knob itself; the chip adds modulation on top of where the knob is set.
Randomize
- Randomize rolls a brand-new sound.
‹goes back to the one before;›goes forward again. - Right-click it for Mild (nudges the sound you have), Medium (the default, a new musical sound) and Wild (goes further and adds one to three new modulation routings).
- Lock a section: right-click a section name such as Field or Colour. It shows LOCKED and Randomize leaves it alone.
- Randomize never touches Master or your MIDI MAP. On Mild and Medium, Feedback stays at 85% or below. Keep a roll you like with Save.
Presets
Nine factory presets are built in. Step through every preset with < >, or click the preset name for the preset browser (see A / B, undo, size and the preset browser). In the browser each factory preset carries its GENERATOR as a tag, and MODULATED if it moves on its own. Presets keep their modulation: routings, envelopes, LFOs and macros.
| Preset | Generator | Character |
|---|---|---|
| 01 Clean Ping-Pong | Spiral | A plain left-right delay, almost no scatter |
| 02 Hyperbolic Spiral | Spiral | The signature even, darkening spiral |
| 03 Lattice Bloom | Lattice | Wandering repeats with a gentle wobble |
| 04 Orbit Freeze | Orbit | High feedback, a sustained, breathing hold |
| 05 Granular Rain | Never Twice | Short, scattered grains |
| 06 Split Worlds Wide | Split Worlds | A separate field on each side |
| 07 Singing Creep | Creep | Short time, long resonant tail |
| 08 Breathing Field | Spiral | Moves on its own with built-in modulation |
| 09 Input Bloom | Lattice | Opens up when you play louder (ENV 1 on the input) |
Save stores your own presets, with a name and the tags you pick; they show under USER in the browser. Init, at the bottom of the browser, returns every control to its default. Copies of the factory presets that an older HOROCYCLE installed move into a _old factory presets folder the first time this version runs, so they don't show twice; any you changed stay where they were, as your own. Presets live in:
- Mac:
~/Music/Sequoia Synthesizers/Horocycle Delay/Presets - Windows:
Documents\Sequoia Synthesizers\Horocycle Delay\Presets
A / B, undo, help and window size
The curved arrows in the header, or Cmd+Z and Shift+Cmd+Z on Mac; Ctrl+Z and Ctrl+Y on Windows. Also at the top of every right-click menu. A whole knob turn undoes in one step.
When lit, rest the mouse on a control for a tip card. The × on a tip hides it for good; right-click Help to bring every tip back.
Click Size in the help bar, or drag the bottom-right corner. Everything scales and stays sharp. Your project remembers the size you choose.
A / B, undo, size and the preset browser
A / B (in the header, right of SAVE). Two complete settings to compare. The lit letter is the one you hear: click the other letter to switch. The first time you click B it starts as a copy of A. The arrow between them copies the lit setting into the other one; right-click it for "Copy A to B" or "Copy B to A". Both are saved with your project, never in presets, and switching never clicks.
UNDO / REDO (the curved arrows left of the preset name). ⌘Z undoes and ⇧⌘Z redoes (Ctrl+Z, Ctrl+Shift+Z or Ctrl+Y on Windows); Undo and Redo also sit at the top of every right-click menu. A whole knob turn is one step, and so are a preset load, INIT, an A / B switch or copy, a RANDOMIZE roll and a MIDI MAP change. Up to 100 steps; the help bar names each one. Automation from your DAW is never undone.
SIZE (bottom right, beside the version). SMALL, MEDIUM, LARGE or EXTRA LARGE, or FIT TO SCREEN. You can also drag the bottom-right corner. The whole window scales as one picture, so nothing moves around. Your project remembers its size, and new windows open at the size you used last.
The preset browser: click the preset name.
- Type in SEARCH to find a preset by name or tag. ALL · FACTORY · USER · FAVOURITES narrows the list; click tag pills to narrow it further (every tag you pick must match).
- Click the star beside a preset to make it a favourite.
- ↑ / ↓ tries each preset at once while HOROCYCLE keeps playing. Enter, a double-click or LOAD keeps it (one undo step). Esc, × or a click outside goes back to the setting you had.
- SAVE in the header opens SAVE PRESET: type a name and click the tags that fit, so you can find it again.
- INIT, FILE… (load a preset file from anywhere) and FOLDER are at the bottom of the browser. ‹ and › beside the name step through every preset.
Parameter reference
Every control your DAW can automate, with its range and default. Modulation parameters (ENV, LFO, macros and the 32 routings) follow these in the automation list.
| Control | Section | Range | Default |
|---|---|---|---|
| Generator (Mode) | Generator | 6 modes | Spiral |
| Lock to BPM | Generator | off / on | off |
| Decay | Field | 0.020 – 1.500 | 0.160 |
| Spin | Field | 0° – 360° | 160° |
| Spread | Field | 1.00 – 1.80 | 1.15 |
| Dark | Field | 0.25 – 3.00 | 1.00 |
| Wavefront | Wavefront | 0.05 – 0.90 | 0.30 |
| Grain Grow | Wavefront | 0.00 – 6.00 | 1.20 |
| Grain Size | Wavefront | 0.25× – 4.00× | 1.00× |
| Diffusion | Wavefront | 0 – 400 ms | 55 ms |
| Time | Transport | 20 ms – 4.00 s | 500 ms |
| Glide | Transport | 0 – 2000 ms | 0 ms |
| Rate | Transport | 0.01 – 8.00 Hz | 0.30 Hz |
| Depth | Transport | 0 – 50% | 0% |
| Feedback | Transport | 0 – 105% | 68% |
| Mix | Transport | 0 – 100% | 50% |
| Width | Transport | 0 – 150% | 100% |
| Tone | Colour | 500 Hz – 18 kHz | 9.00 kHz |
| Reso | Colour | 0.5 – 24.0 | 0.9 |
| Drive | Colour | 1.00 – 8.00 | 1.00 |
| Partials | Colour | 0 – 100% | 0% |
| Tune | Colour | 55 – 880 Hz | 110 Hz |
| Inharm | Colour | 0.00 – 0.60 | 0.20 |
| Master | Header | −24 – +6 dB | 0 dB |
Troubleshooting and tips
| What you see | What to do |
|---|---|
| WHEEL, VELO, PRESS or KEY never move | No MIDI is reaching HOROCYCLE. Move it to the instrument track, after the synth, and arm the track, or route MIDI to it in your DAW. The help bar tells you when no MIDI has arrived. |
| PRESS does nothing | Press harder on a key you are already holding. If nothing happens, your keyboard's keys may not send aftertouch; try its pads. |
| The knobs follow the beat, then stop | ENV 1 follows the incoming audio by default. When the audio stops, so does ENV 1. Change its Trig to a beat length or NOTE. |
| An LFO's Rise seems to do nothing | Rise starts on each new note. Without notes coming in, the LFO runs at full height. |
| The tail runs away | Feedback above 100% holds and saturates by design. Bring it under 100%, or ride Mix. |
| New plugin version doesn't show | Remove HOROCYCLE from the track and add it again, or restart your DAW. Rescan plugins if your DAW asks. |
- Set Spin to exactly 180° for a classic ping-pong, then nudge it to make the echoes circle.
- Grain Size at 2× is smooth; below 1× the echoes break into fragments.
- Reso with high Feedback makes the loop sing at the Tone frequency.
- For a freeze, choose Orbit, push Feedback toward 95%, and play over it.